

I did tease a bit on the previous blog post, but now it’s all finished! A PCB to turn the RP2350 board I made into a small PC. It has the following features:
- PS/2 connectors for mouse/keyboard.
- USB hub and 3 USB ports
- Audio via an I2S DAC
- RTC for timekeeping
- NES controller port
- MicroSD slot via SDIO
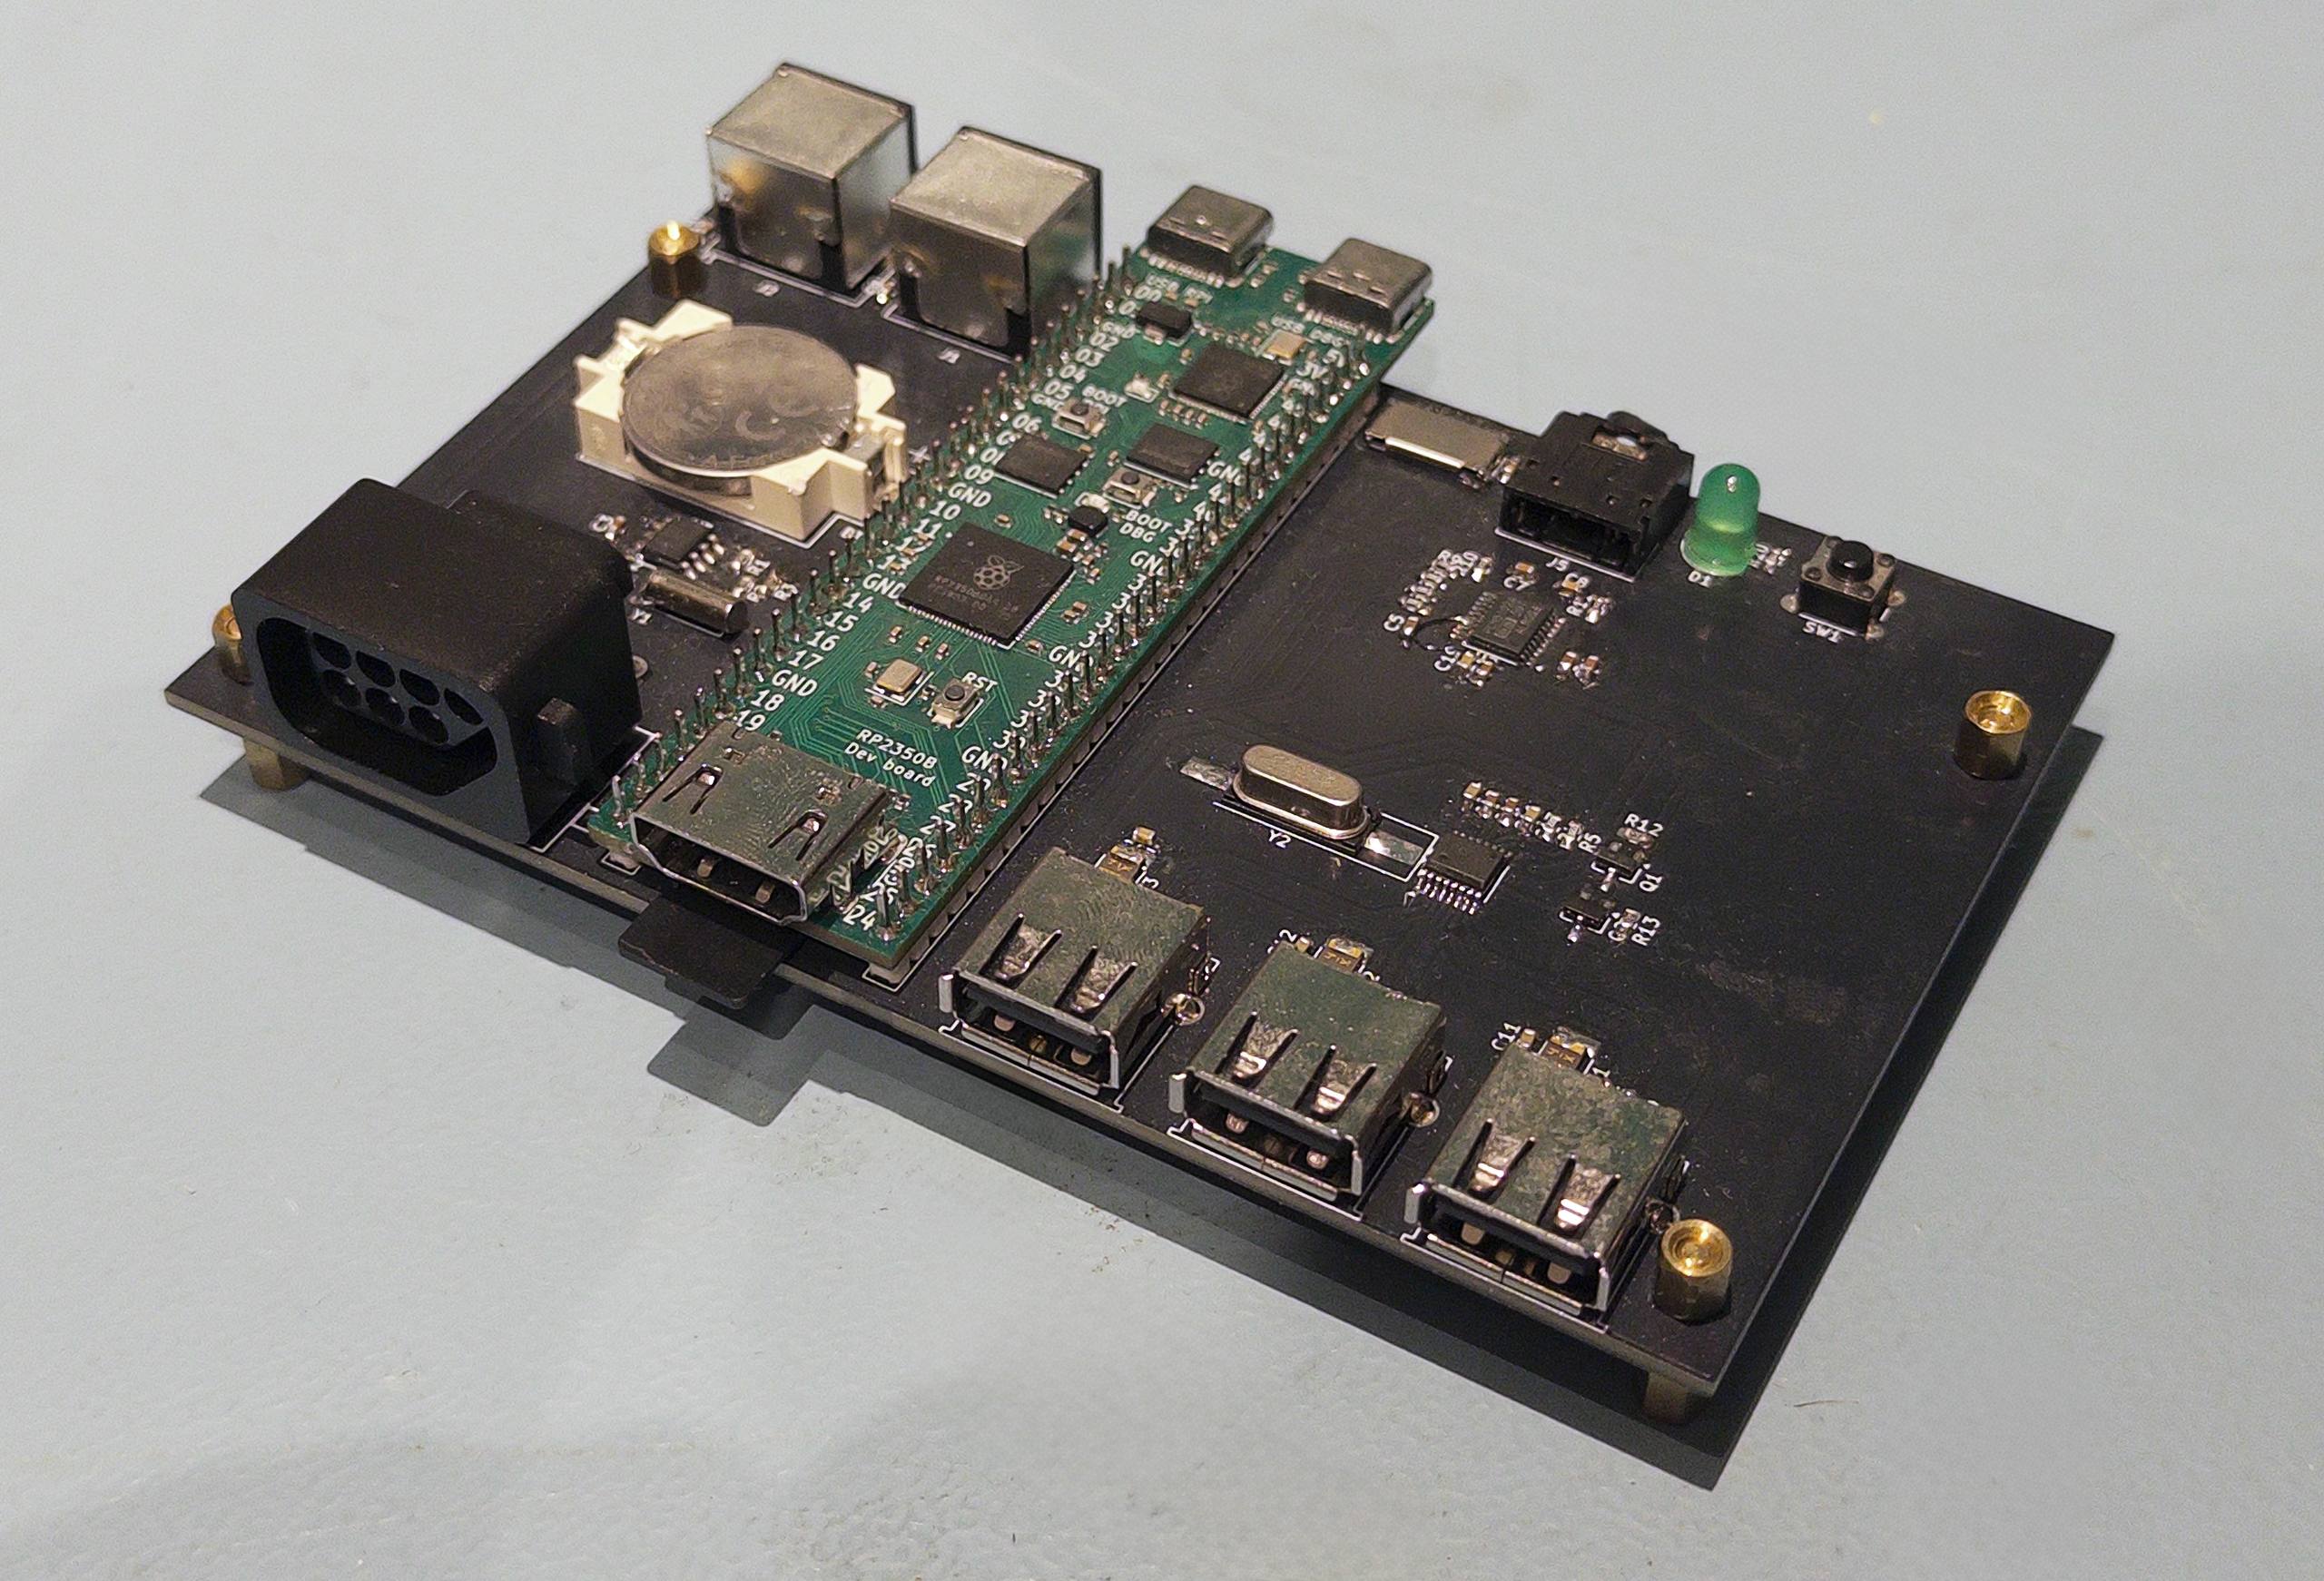
So why these? First of all, PS/2 is nice and simple, but the soldered on connectors I had where a bit annoying. Sadly PS/2 mice can be a bit hard to find, so I wanted to add USB as well. Of course, for games, a NES controller is fun, and new ones can be bought cheap from Aliexpress.
Almost any computer has some form of timekeeping, so an RTC was a no brainer. I wanted to play with audio on the RP2350B, and Varvara has an audio device. The extra SD is the least needed feature, but I wanted to see how much faster an SDIO interfaced SD card is.
Of course, this also meant adding a few missing features to my port of UXN/Varvara. But let’s first start with a bit of hardware design!
Read more: A Pi Pico 2 PC for Varvara!Hardware design
On the hardware side, a few peripherals are quite easy to implement. The PS/2 ports just need to be hooked up in the same matter as I did before. The NES controller also doesn’t need any external parts, as the RP2350 is 5V compatible. And finally, the MicroSD is also just a connect to the right pins kind of affair!
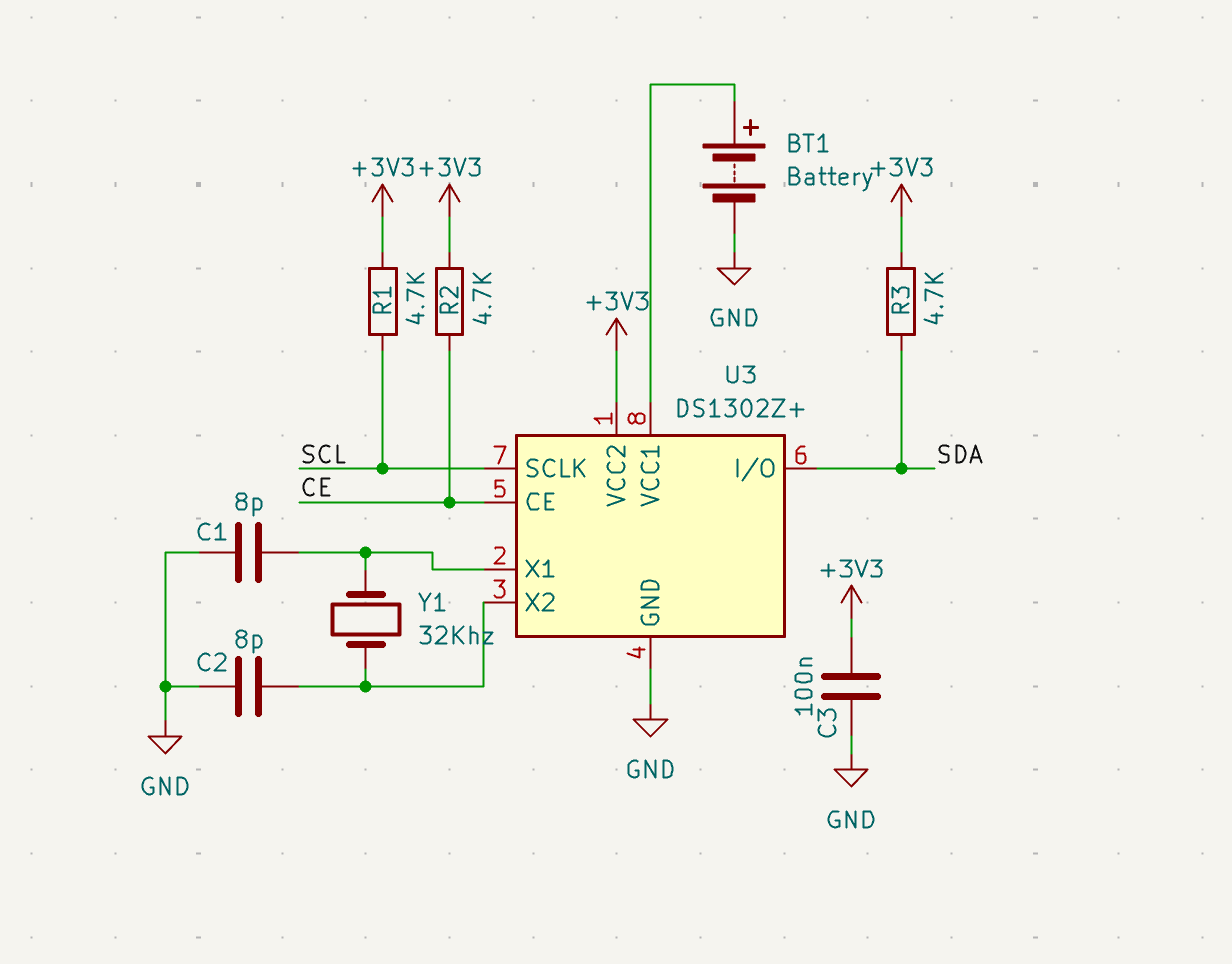
For the RTC I picked the DS1302Z as it’s cheap and I had some laying around. This is mostly a matter of following the datasheet, make sure there are pullups on I2C and it should be alright!
USB and Audio
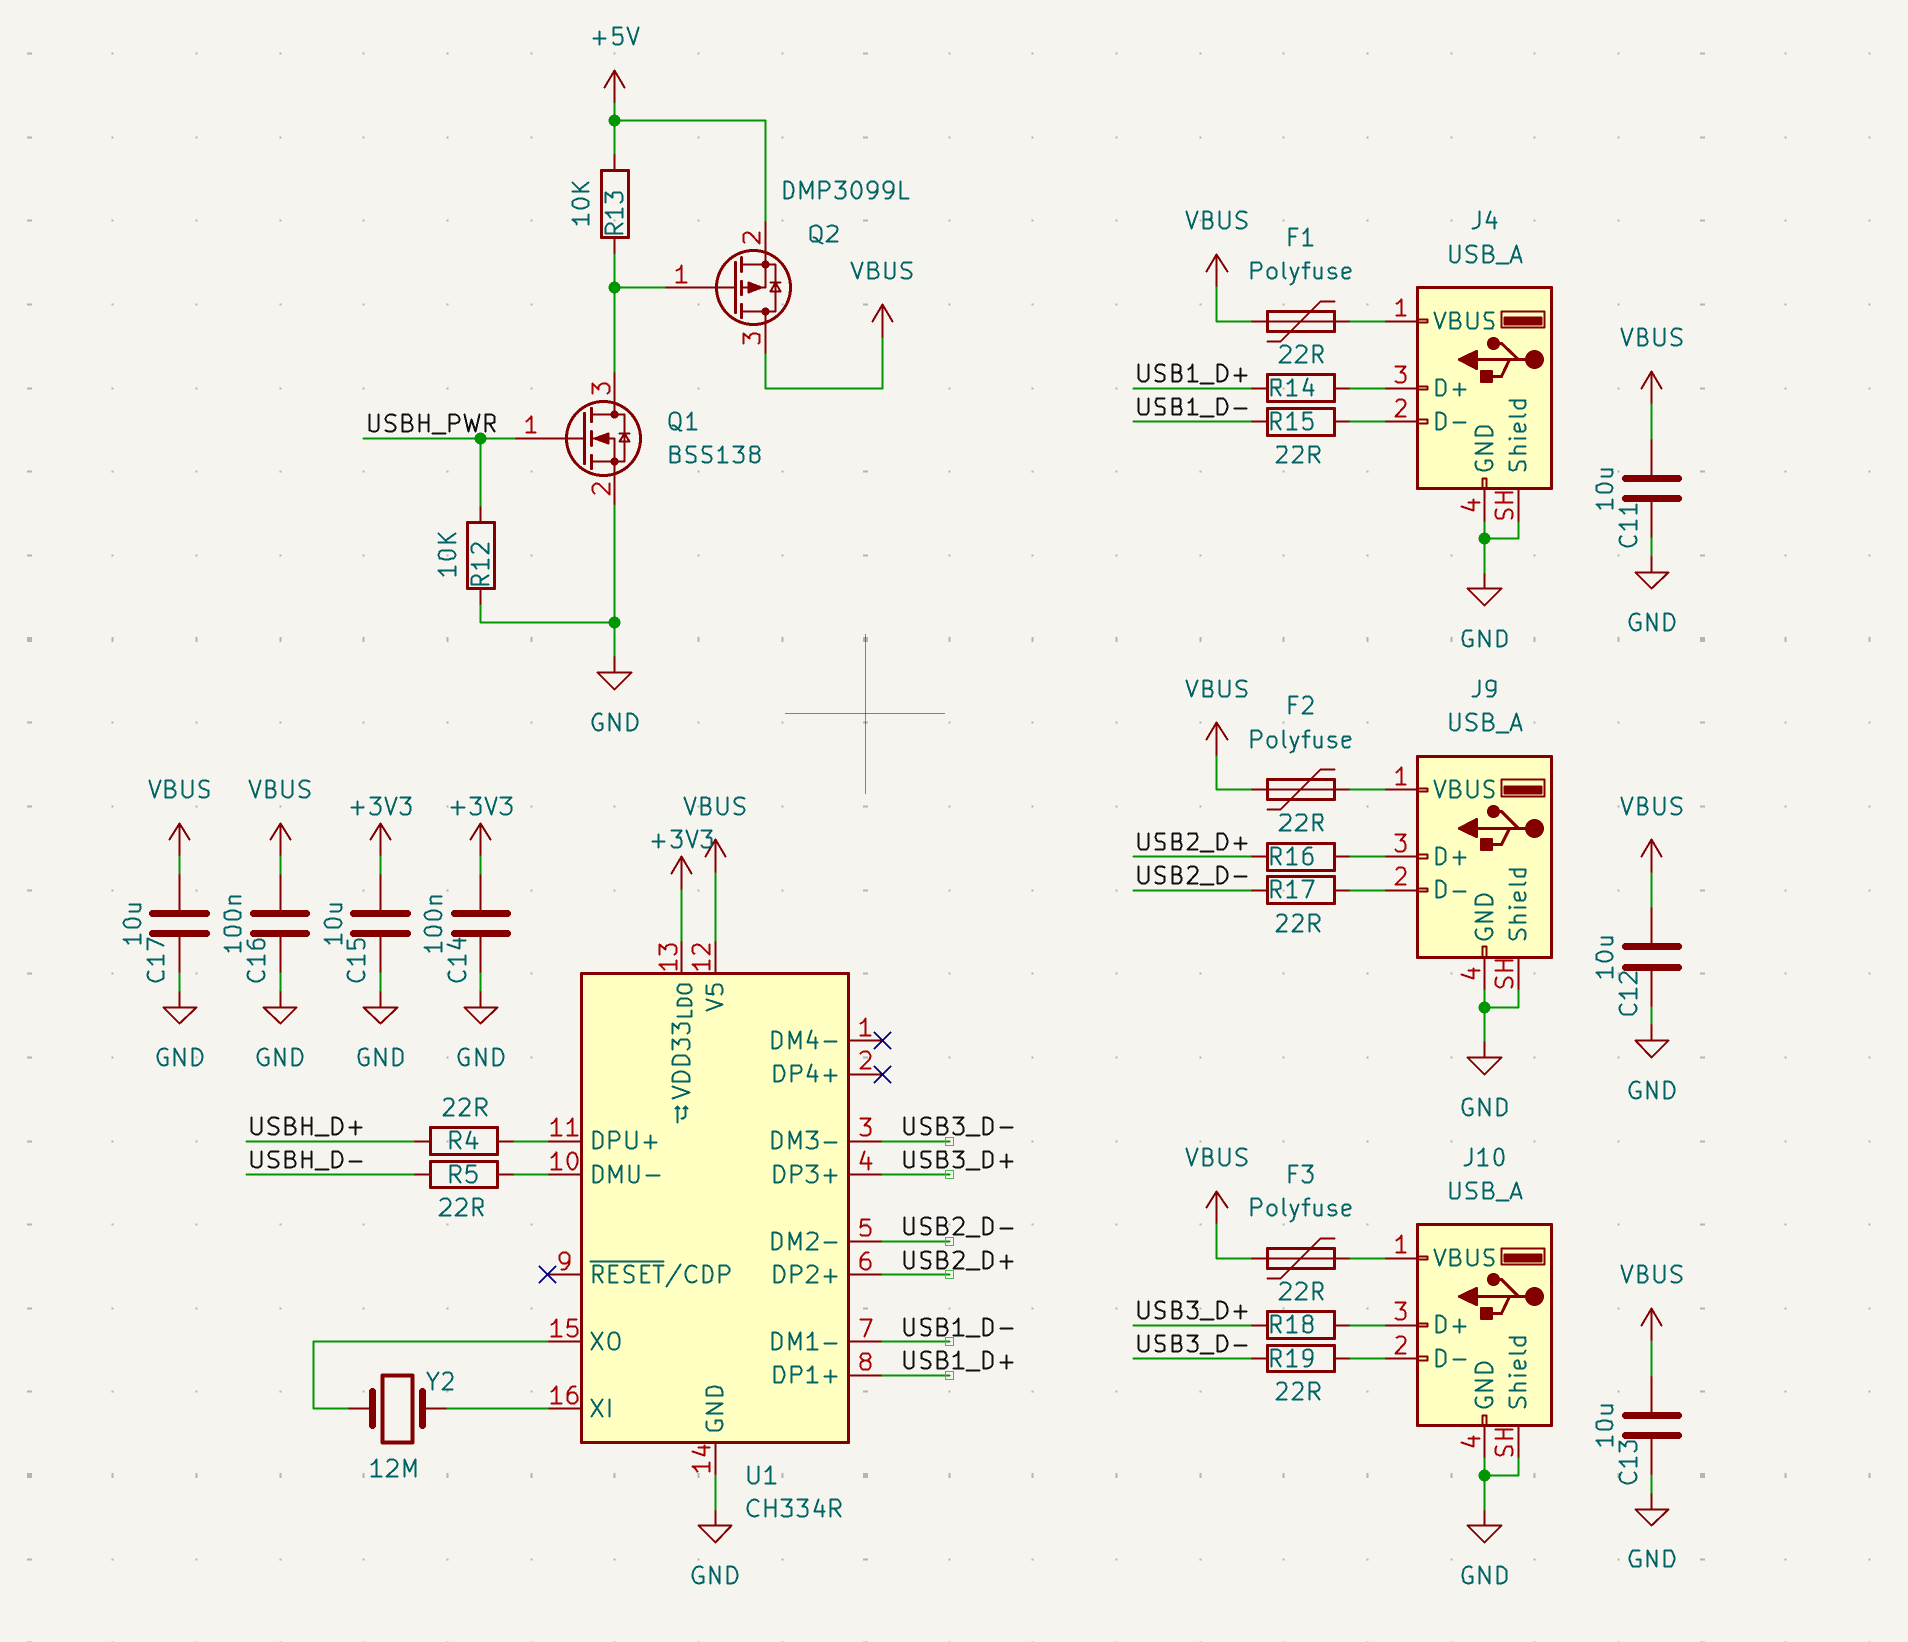
As I wanted more then 1 USB port, a hub is needed! Luckily, a USB hub is a little easier then I remembered, as there are now very affordable USB hub chips from whc-ic, like the CH334R. In terms of extra parts, a 12Mhz oscillator and some series resistors are most of the required parts. For a little protection, I also added a resettable fuse on every USB port and a power switch to turn the VBUS 5V on/off. Of course, a proper USB hub would have some more parts, like esd protection and the likes, but eh hobby stuff means we can cheat a little.
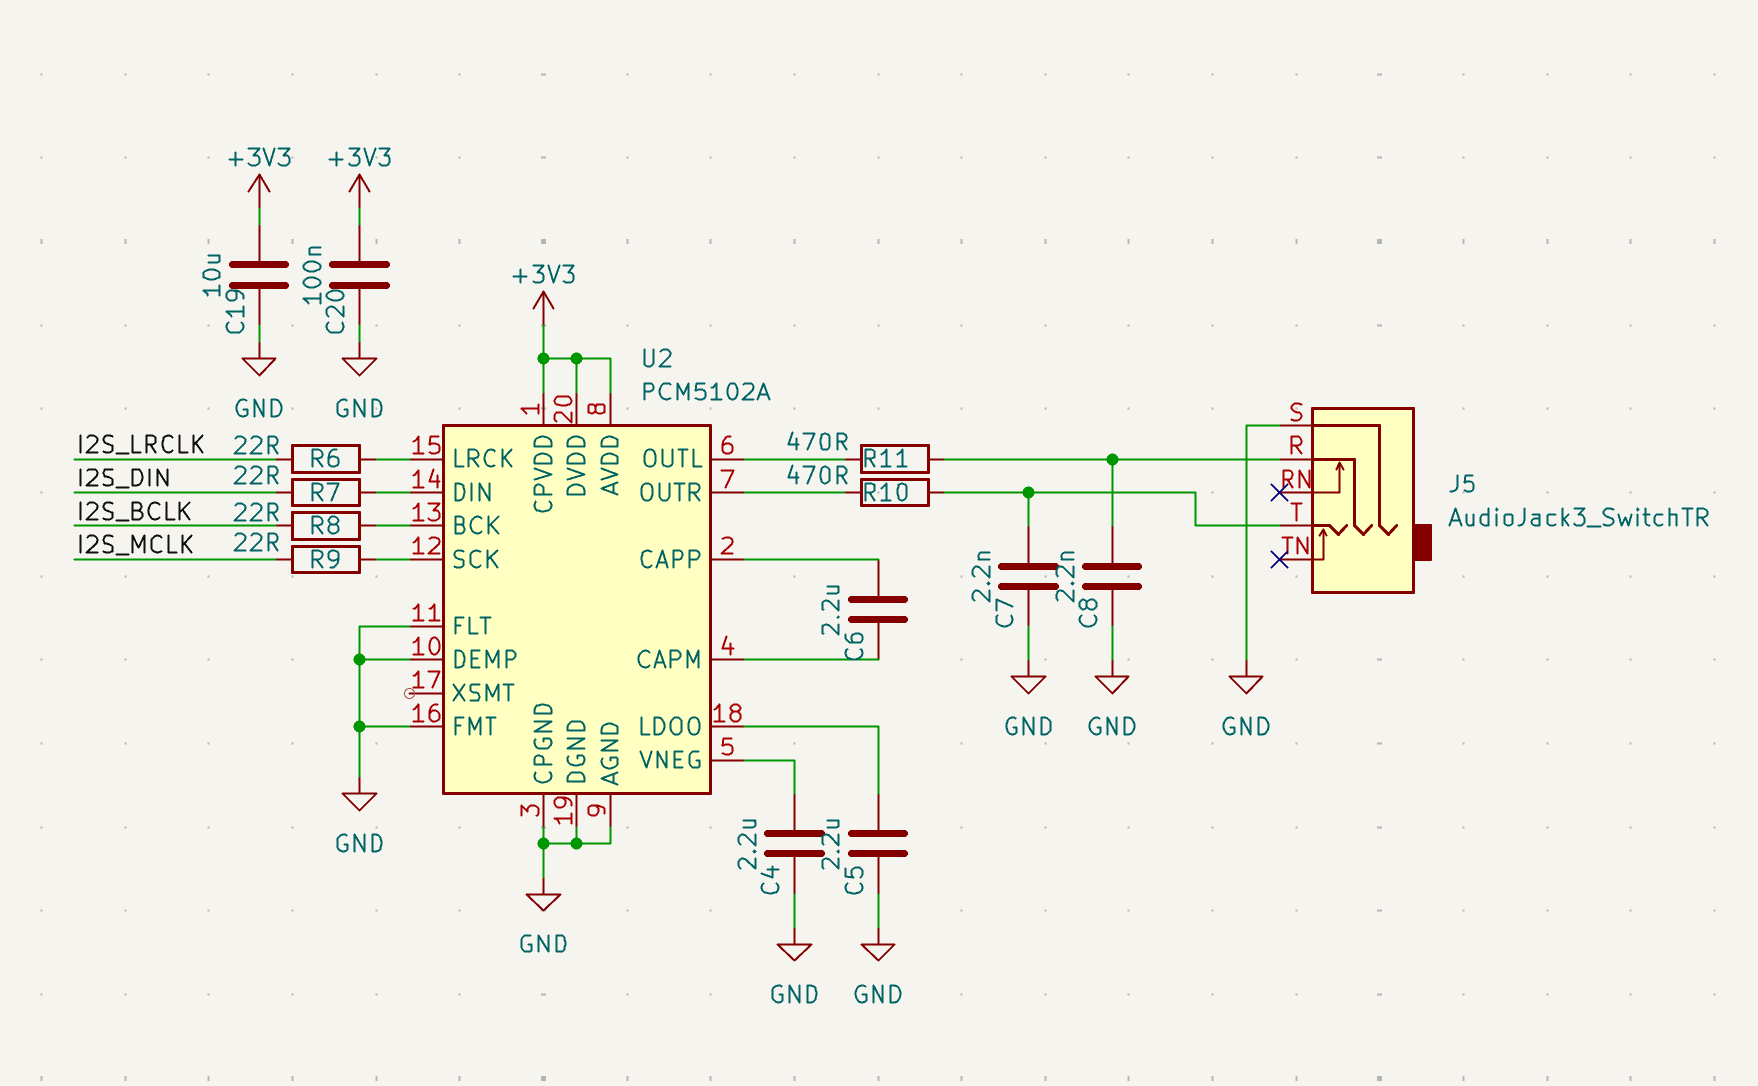
And finally, audio. There are some great libraries for I2S audio for the pi pico, so let’s use an I2S DAC. I went for the PCM5102A as it’s a popular IC with affordable dev boards for sale (which I can peek at the schematic of). Again, not a lot to connect, but a few pins are interesting, the FLT, DEMP, XSMT and FMT pins.
FLT selects the internal filter, connect to GND for the normal FIR filter, or to VCC for the low latency filter. DEMP controls the De-emphasis. XSMT is the soft mute and FMT is the audio format selection, GND for I2S, VCC for left justified.
Here I made a little mistake and I forgot to connect the XSMT pin, so my audio was always muted… Amazingly this was the only bodge I had to do on the entire board.
PCB design
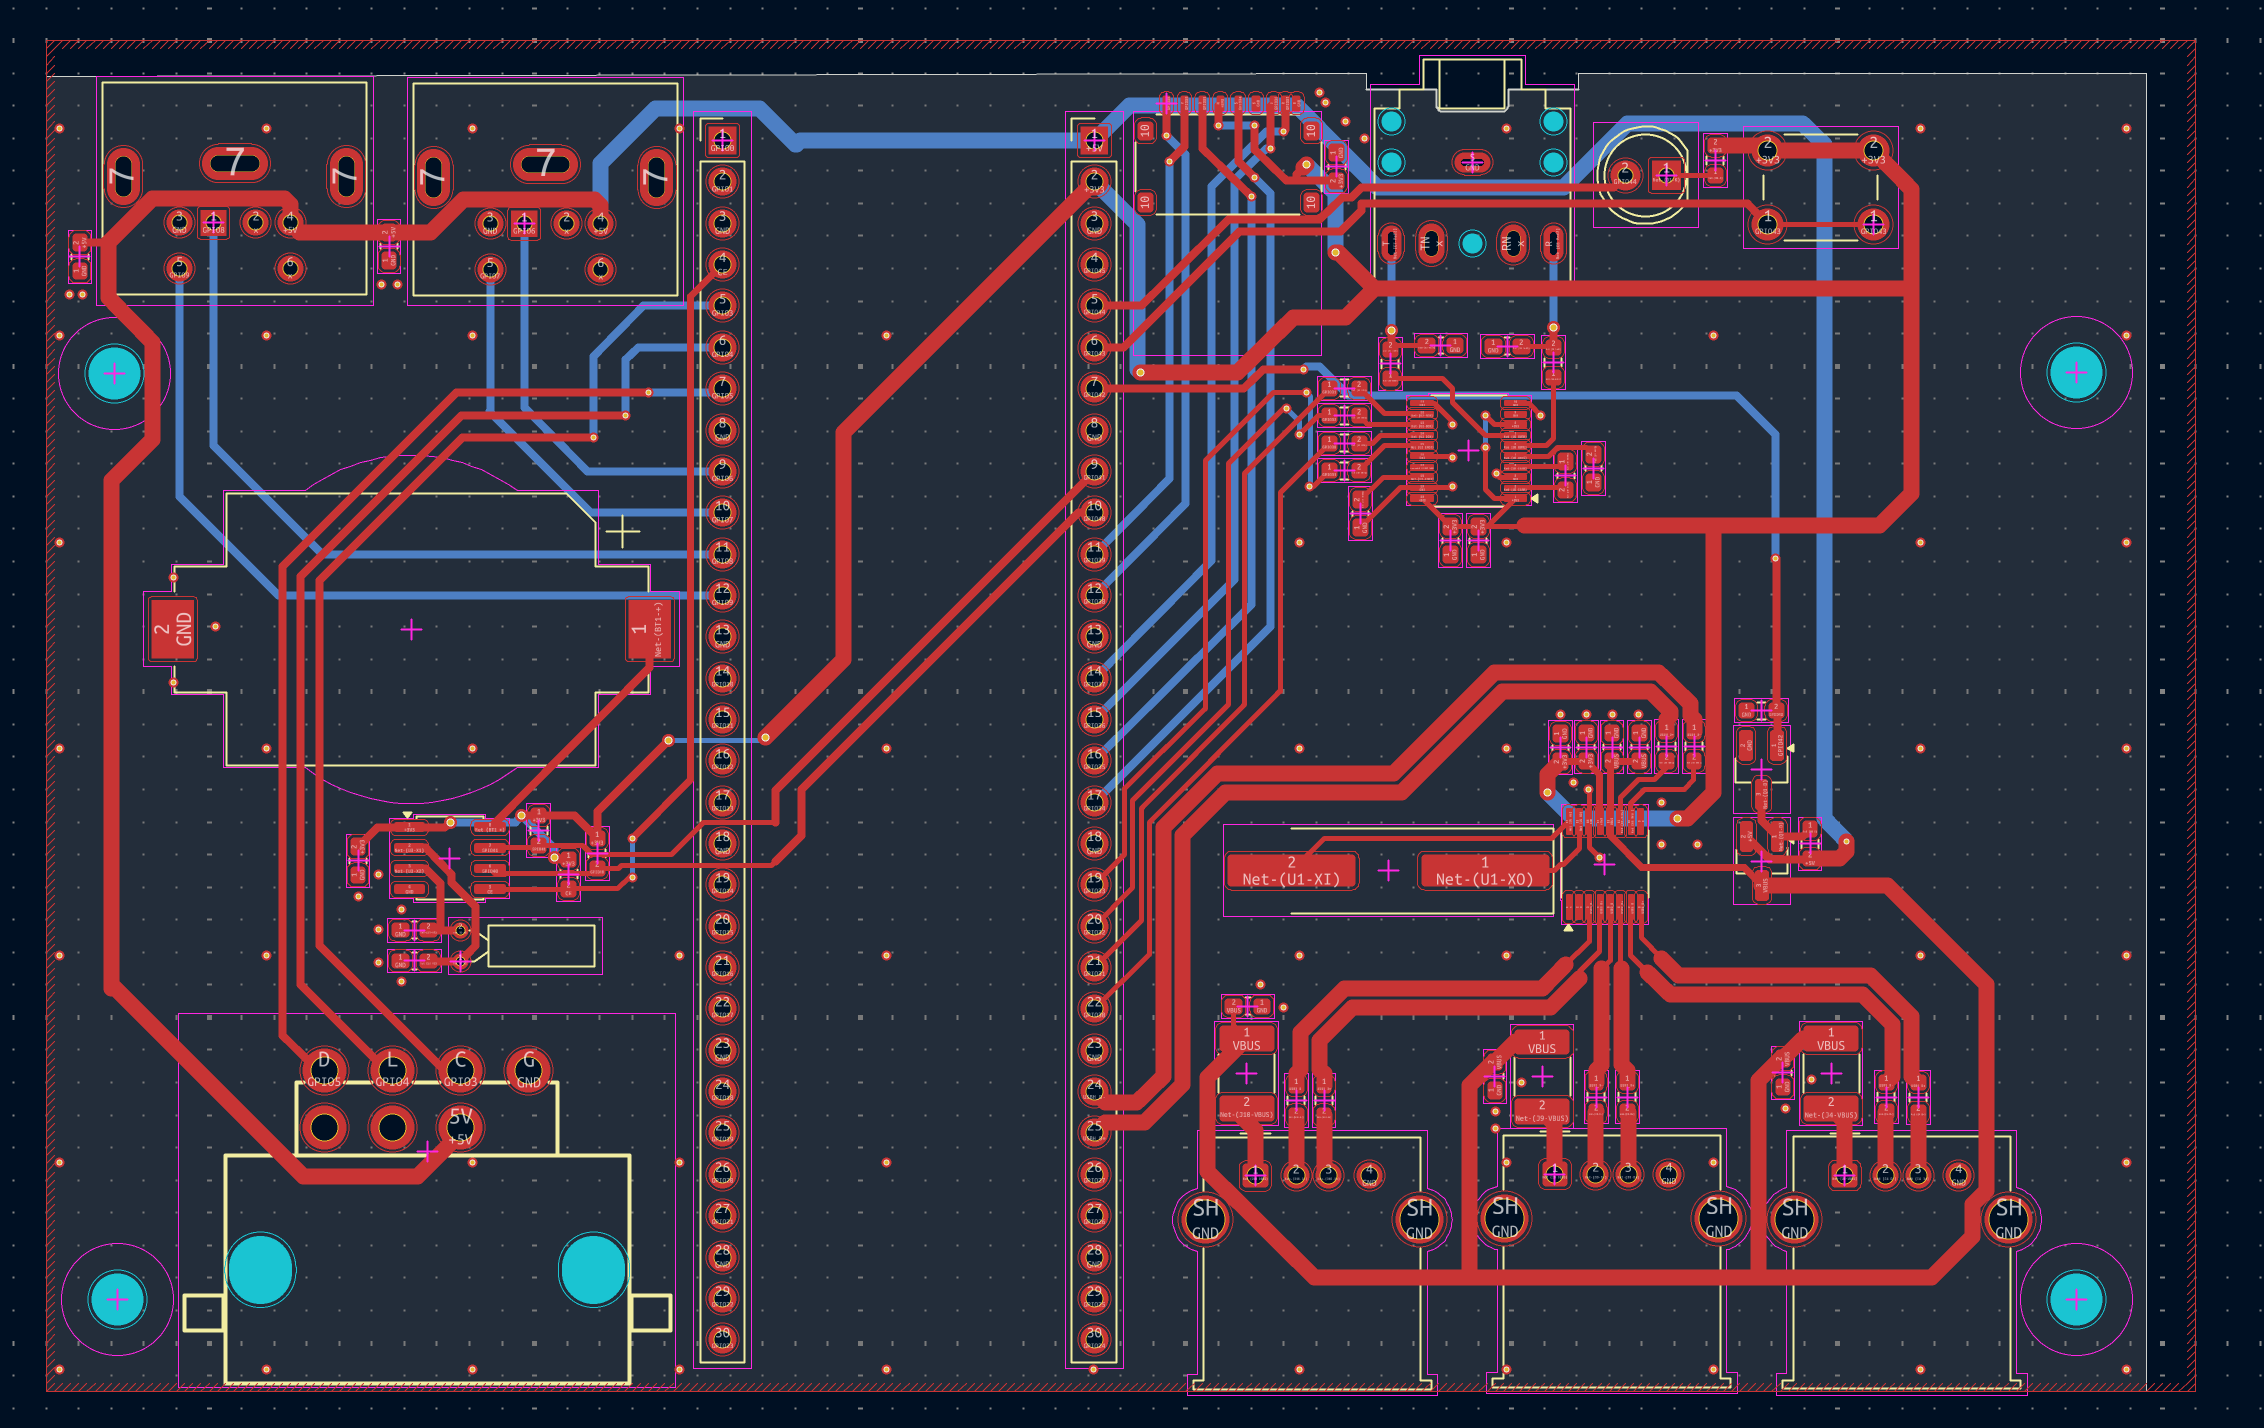
This all got routed on a fairly simple 2 layer PCB. The USB traces should have a controlled impedance, and I tried to calculate the trace thickness, but for a 2 layer PCB this results in some thicc ass traces. The proper way would be a 4 layer PCB so there is less distance between a ground plane and the USB traces but alas, it’s a hobby board and I’m just doing full speed USB anyways.
Software, or adding libraries to the problem!
A couple of things can be added somewhat easily by adding a few existing libraries. Pico-PIO-USB is a great library that adds USB by using a PIO block. This works together with TinyUSB from the pi pico SDK so the usual examples from the SDK can be used. The SD card library I used already supports SDIO cards as well, so that’s easy!
For audio, there is the pico extra‘s which has a nice sound library with I2S support. And last, for the RTC there is a pico-ds1302 library which works great.
Of course, that’s just support for the new peripherals, I still need to add support to Varvara!
Datetime, file system and NES controller
Let’s get a few easy ones done first, with a working RTC, datetime support is quite simple. Once a second, read the time and update the ports. Varvara does not support changing the datetime, as normally it runs on a computer with an OS. I added support for writing to datetime ports to be able to do so. The datetime.c file with these changes can be found here.
Varvara supports two file devices, so having a second microsd slot means we can have that! After adding support to the hw_config file for the second microsd, it’s mostly making sure there are two uxnfile structs and copying the filea calls in the file device.
The nes controller is polled every frame, the protocol is pretty simple, as there is just an 8 bit parallel to serial IC inside.
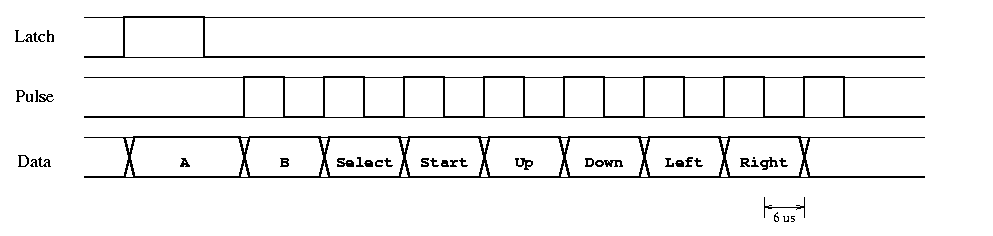
As can be seen in the timing graph, the latch pin has to be pulsed, and then 8 clock pulses are put on the clock pin. At every clock, the data pin is read in. The data pin is active low, so it’s inverted to read in a high for each button that can be pressed. The function is blocking, but done in a fairly short amount of time so it seems to be fine.
void checkNesController()
{
	uint8_t mask = 0;
	gpio_put(m_latchPin, true);
	busy_wait_us(12);
	gpio_put(m_latchPin, false);
	busy_wait_us(6);

	for (int i = 0; i < 8; ++i)
	{
		mask |= !gpio_get(m_dataPin) << i;
		gpio_put(m_clockPin, true);
		busy_wait_us(6);
		gpio_put(m_clockPin, false);
		busy_wait_us(6);
	}

	...
}
With these handled, let’s look at the more interesting peripherals!
Audio
Getting audio to run on anything is always a “fun” challenge. For this board, it’s again two parts. Getting the drivers up and running, and porting the Varvara audio device.
The driver is the Pico Audio driver from the pico-extra’s repository, and the initialization code is based on the audio_i2s example. It initializes a dual channel audio at 44.1Khz, with a 512 byte buffer. This uses a PIO plus DMA to output I2S data with low CPU load, neat!
Varvara can generate up to 4 notes, with an ADSR envelope applied. What it does is play a sample from a place in memory with a fixed length, looping until it reaches the end of the envelope. A volume per channel is defined as well. As 4 notes can be played simultaneously, stereo can be done by playing some notes with the volume on zero on left or right.
Luckily, most of the code can be re-used. But the uxn11 example used assumed a callback is called when new audio data is needed. The pico audio library doesn’t work this way. Instead this “callback” function is called from the main loop now, and just doesn’t render any audio when not needed!
USB Keyboard/mouse
Right, just one block left, USB. The PCB has a USB hub with 3 ports attached, so in the tusb_config.h, a total of 4 devices is set as maximum, and usb host is enabled. As I want to use 2 pins via PIO, the usb configuration contains the pins and pinout (is the first pin D+ or D-). After this USB is initialized and a callback function is used to handle incoming device calls. Of course, the pin for the 5V on/off should also be enabled.
I’m just interested in mouse and keyboard events, so everything else is just ignored :)
void tuh_hid_report_received_cb(uint8_t dev_addr, uint8_t instance, uint8_t const *report, uint16_t len)
{
    (void)len;
    uint8_t const itf_protocol = tuh_hid_interface_protocol(dev_addr, instance);

    switch (itf_protocol)
    {
    case HID_ITF_PROTOCOL_KEYBOARD:
        process_kbd_report(dev_addr, (hid_keyboard_report_t const *)report);
        break;

    case HID_ITF_PROTOCOL_MOUSE:
        process_mouse_report(dev_addr, (hid_mouse_report_t const *)report);
        break;

    default:
        break;
    }
 ...
}
A mouse event is quite simple, it contains the x and y offset, so how much is moved compared to the previous report, and the mouse buttons. Handling this and controlling the Varvara mouse is very similar to the PS/2 mouse luckily!
The keyboard however, is a bit less similar. For instance, the keycodes are different between PS/2 and USB, and on USB, you can have 6 keys pressed at the same time, for PS/2 you just have to worry about one! And on PS/2 you get a nice pressed/released event per key. With all of this, the code to handle USB keyboard reports is a tad more involved.
At this point, with HDMI, SDIO for MicroSD, I2S audio and USB, all the PIO’s of the RP2350 are in use. I guess that’s a new achievement unlocked!
What else can we run?
Of course, being able to run Varvara is a lot of fun, and the goal for this project for me. But there has been a ton of computer stuff ported to the RP2350. One of the more famous examples is the pico-mac! So let’s see if that runs on this little board too.
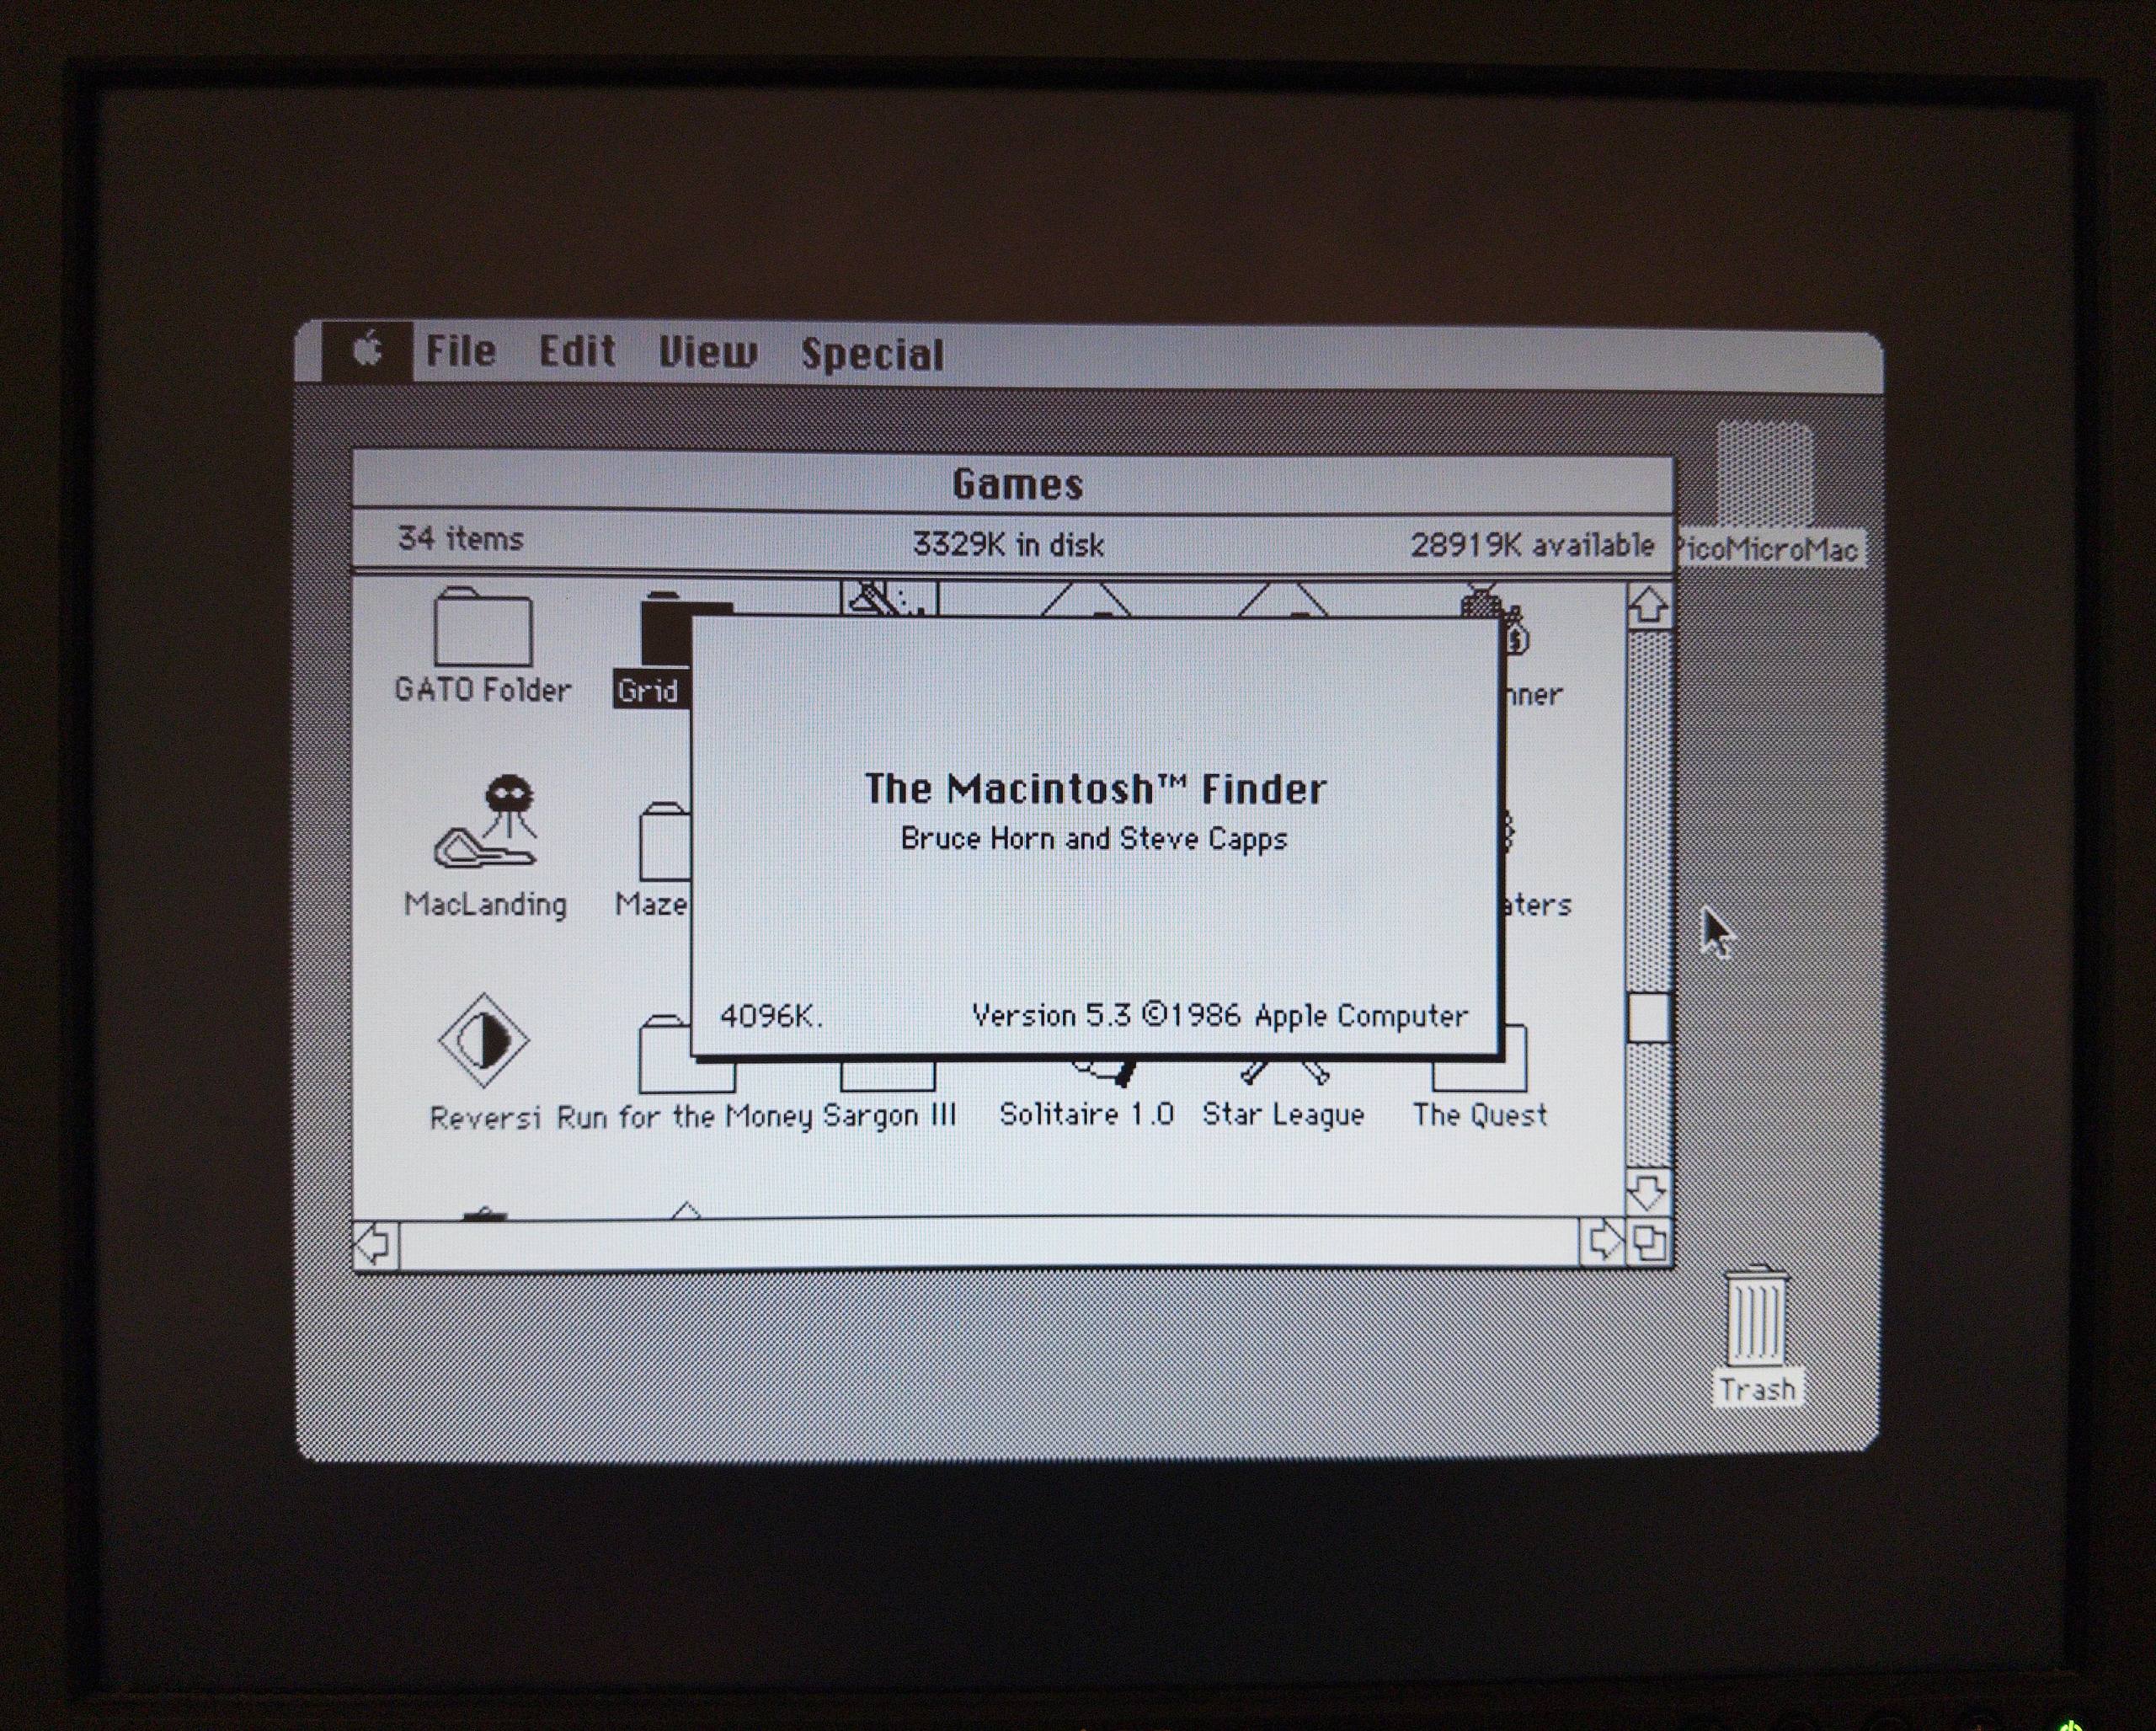
Cool! So that took a little bit of porting effort, though I did already port it to the RP2350 BellsNWhistles beforehand. With audio already done before, adding that in was pretty easy! It can be used with the on board USB and no audio so the PC Board is not needed by setting the PCBOARD cmake argument to zero in the CMakeLists.txt
set(PCBOARD 0 CACHE STRING "PCBoard used")Conclusion
That concludes the “little” dive into UXN and Varvara! I started experimenting with this a few years ago with the RP2040, but now with the RP2350 it finally runs pretty well. It’s a mostly feature complete implementation and uses almost all of the RP2350!
All it took was several months, a custom RP2350B board that’s now for sale on Tindie and another board to turn it into a small PC, whoops…
Of course, all code can be found on github for Varvara, pico-mac, PCBoard, and the BellsNWhistles board. I also sell the BellsNWhistles board on Tindie now!
Huge shout out to the people behind UXN, and the amazing content they make from a sailboat!
As always, if you enjoyed this blog post, you can buy me a coffee!
So, what do you think ?