

When the Raspberry pi launched in 2012, it sold out immediately and became an instant hit overnight. The combination of a powerful enough Linux board, capable of Full HD video and an unbelievably low price of $25 was unheard of back in the day. And after 10 years, well over 40 million of them have been sold.
Of course, this was not the first Single Board Computer (SBC) that could run Linux. When I saw an add pop up on the local version of Ebay with some Atmel Linux boards from 2007 I was curious. When I saw it was an AVR32 CPU, something that Atmel discontinued quite a while ago, I gotten even more curious and picked them up. It even came with a CD with the original board support package (BSP)
So let’s have a look at this SBC, the AVR32 CPU, how to use them in 2022 and what they can still do.
The Atmel NGW100 SBC
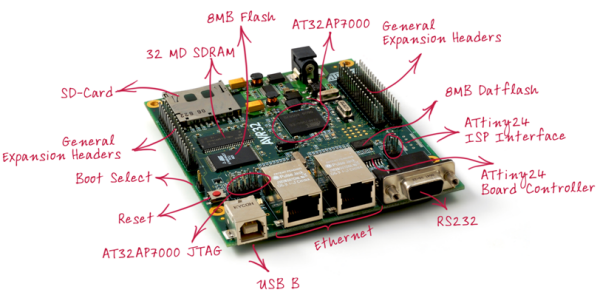
The NGW100 was a SBC from Atmel, which was $100 or $50 with student discount from what I could find. The AVR32 CPU ran at 140Mhz and was paired to 32MB of SDRAM. A big difference from the 700Mhz CPU and 256/512MB RAM of the first Raspberry pi! For storage, it has 8MB parallel flash and 8MB SPI flash. The latter can only be used for data storage. Of course there is an SD-card slot but it cannot boot from that directly. A bootloader like u-boot has to be located on the 8MB parallel flash which could then boot from SD-card.
Now of course, this board has not 1 but 2 network ports! That makes up for the lack of video out right? And yes, there used to be OpenWRT support for this board, though I doubt it makes for a good router nowadays.
What about that AVR32 CPU
One of the things I was curious about was the CPU. I heard of the AVR32 before, but as a microcontroller, not a Linux capable CPU. A look on Wikipedia revealed why. Atmel launched 2 versions of the AVR32 core. The first, the AP7, was a Linux capable core with an MMU and the UC3, a microcontroller core. A lot more UC3 devices where made and they where fairly popular. The AP7 stuff was discontinued in 2013 while the UC3 devices are still being made.
Setting up a build environment
As the AVR32 is a little bit old, you sadly can’t just install a compiler and be on your way. Well, you can if you are still rocking Ubuntu 6.06 as that is what the BSP was made for. I tried installing Ubuntu 6.06 in a VM with Virtualbox or QEMU but this didn’t go as I hoped. Apparently a 32 bit ancient Ubuntu works, but rather poorly. And guest additions in Virtualbox didn’t work and the resolution was stuck at something low. Instead I opted for Ubuntu 8.04. Still old, but a little less. This worked OK enough in Virtualbox. So now to actually compiling something.
I wanted to use Buildroot to build Linux for this board. Buildroot is a set of makefiles and tools to automate building an embedded Linux image and getting cross compiling up and running. This board was supported by Buildroot. Was. The last version of Buildroot that supported it was 2013.08. So that should be, git clone, make atngw100_defconfig and then make. And what do you know, it was this simple! Buildroot really is amazing!
u-boot problems
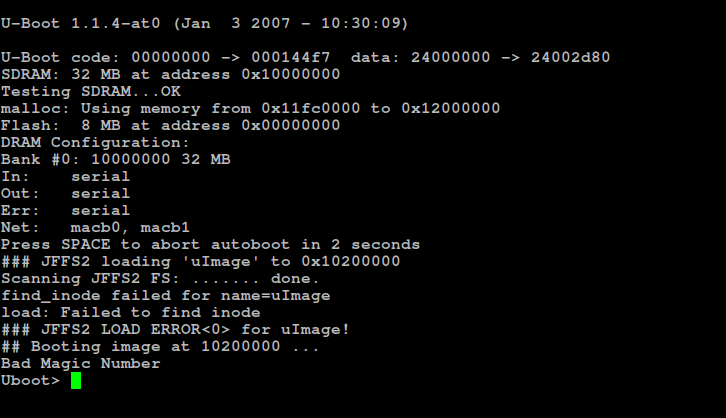
Compiling took around 30 minutes but it resulted in an embedded Linux that I could flash on the board and use. The output is an JFFS2 file, which is a filesystem meant for NOR flash. But eeuhm, how to work with that. Luckily the OpenWRT link from earlier has that nicely explained. I tried to just flash the latest image over via u-boot first, but the default jffs2 file that is generated does not have the Linux kernel inside and is just the root filesystem. This results in the following message.
Buildroot does also output a Linux kernel with the correct name (uImage) so how to stuff that into the jffs2 file? Luckily, Buildroot also generates a tar file for the root filesystem. So let’s unpack that, add the uImage file and create a new jffs2 file to flash. To do so, the following steps are needed:
mkdir test
sudo tar -C test/ -xf rootfs.tar
mv uImage test/uImage
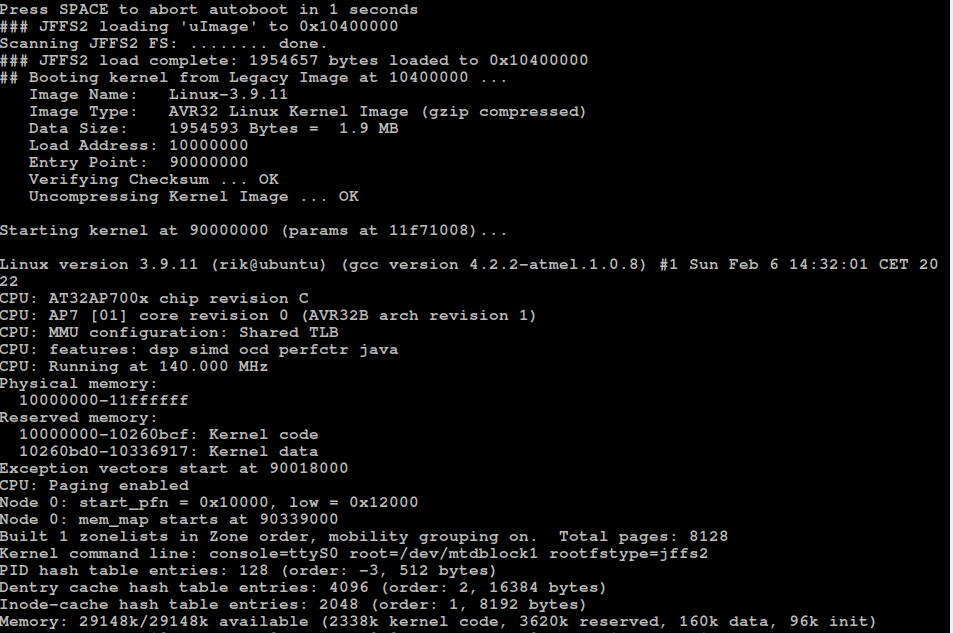
sudo mkfs.jffs2 --output=~/Documents/buildroot/output/test.img --root=~/Documents/buildroot/output/images/test/ --big-endian --pagesize=4096 --eraseblock=65536And that gives us a working bootable Linux image:
Time for some benchmarks!
After booting, the board is usable enough, commands in the terminal feel fast enough and the kernel is somewhat modern. The RAM usage is around 5MB of the 32 at idle. But how fast is it really? Let’s install a benchmarking tool!
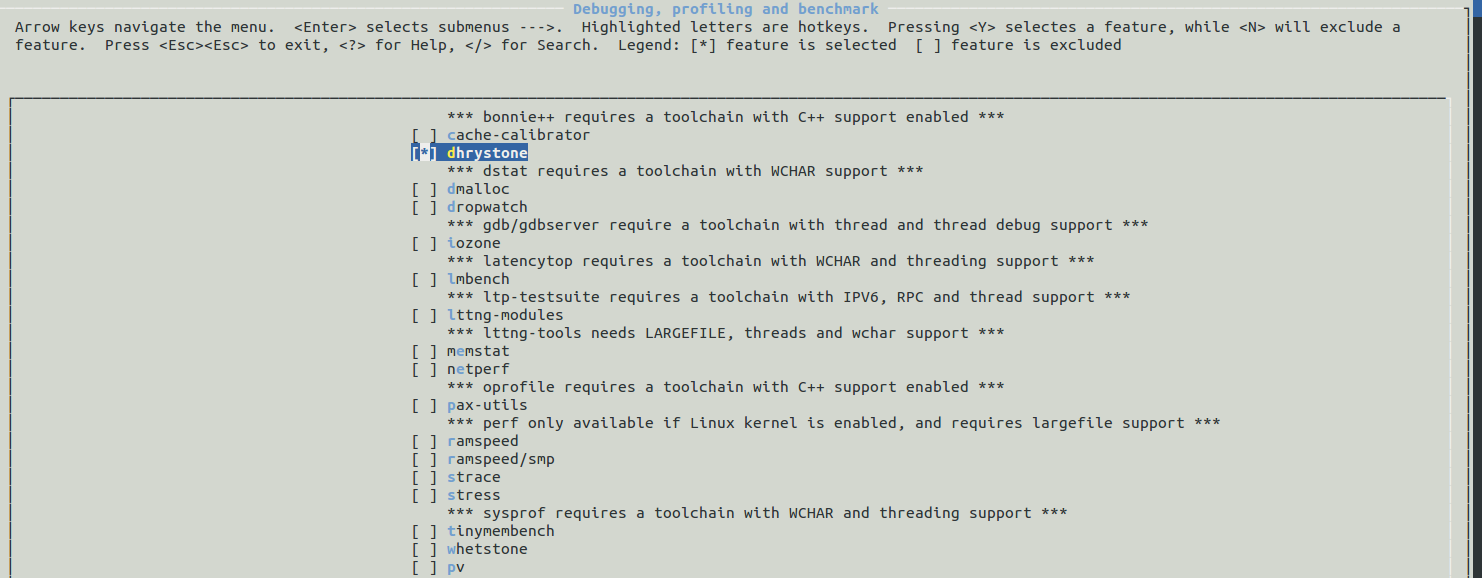
If you never worked with Buildroot, it’s really easy to add a package. After executing the “make menuconfig” command you are greeted with a nice terminal UI. Going into Target packages -> debugging, profiling and benchmark gives plenty of options, including the classic Dhrystone
So after a compile and flash of the board, Dhrystone is installed. Running it gives me the following:
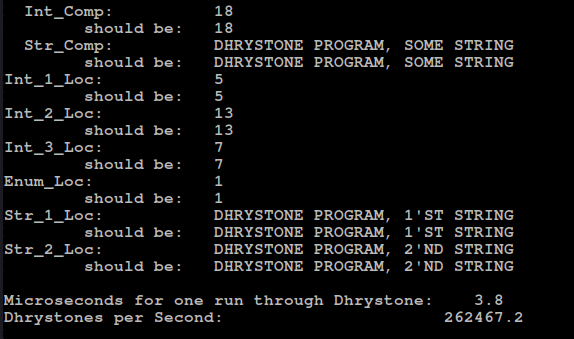
To convert this to DMIPS this needs to be divided by 1757. So 262467 / 1757 gives 149DMIPS which is comparable to the Cray 1 supercomputer, and an ARM Cortex M3 at 100Mhz. So not great, not terrible.
With the performance settled, what can it still be used for? I think that something like a simple webserver or perhaps an IRC should be perfectly usable, so let’s do that!
Setting up an IRC server
I have tried setting up IRC on a modern machine before and it was not fun, getting services like Nickserv and such to work are a bit of a pain. So let’s see how that goes on this old machine with Buildroot.
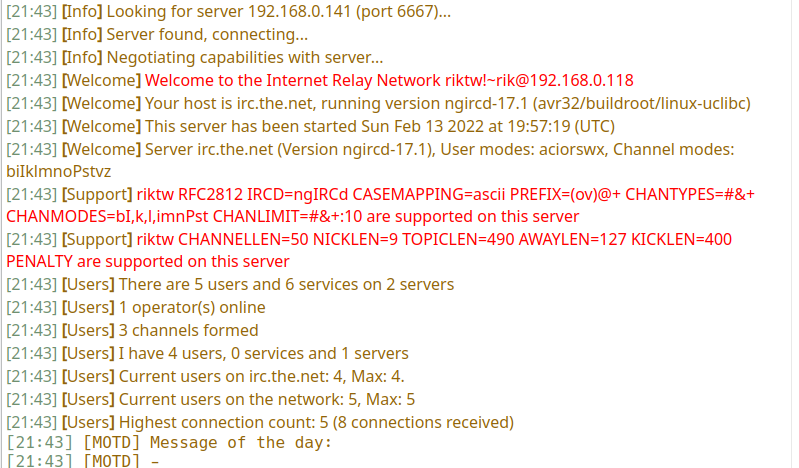
First the easy one, IRC. A look at the target packages -> networking packages shows me that there is an IRC server, ngircd. So enabling that, building and indeed, a basic IRC server shows up. ngircd 17.1 to be exact. Looking at the docs of that exact ngircd, services can be added using a program called “irc services“. Perfect name right :)
So just cross compile that for AVR32, set it up according to the instructions and call it a day right? Right??
This is where the fun started!
Cross compiling irc services
Buildroot also generates all the needed cross compile tools, they are located in the buildroot/output/host folder. buildroot/output/host/usr/bin to be exact for the GCC cross compiler. I added this to my path to get a working cross compiler.

Now IRC services was not meant to cross compile. Some programs it’s as easy as a configure flag to tell what compiler to use but not this time. IRC Services tests the compiler by building some test sources, running them and looking at the output. That won’t work when cross compiling!
I eventually ran the ./configure step with the normal x86 compiler and then manually changed the makefile.inc file to have the correct compiler. The linker is hardcoded in the modules/makerules file and was something I also had to change. One of the build steps is to compile a tool to parse the language files used by the services into a binary, again a step that won’t work with cross compiling. After all that I had a compiled irc services program.
So to summarize, if someone ever wants to cross compile it:
1. configure and make using the normal compiler. Copy the generated language blobs to somewhere
2. Change the compiler in makefile.inc and the linker in modules/makerules
3. Compile for target, copy all files over, adding the language blobs from earlier.
IRC Services setup
After all that, setting up was fairly easy, just follow the steps of the ngircd documentation. I disabled a few settings like sending an email for confirmation as I was not planning to setup an e-mail server. There is also a simple webserver included in the IRC services that I also disabled. The configs can be found on Github and should be a good starting point for setting such things up.
One thing I did not setup was any form of security like SSL. SSL on this CPU is quite slow and an SSL version of 10 years ago will probably just give the sense of security, and not actual security :)
With all that out of the way, time to add all of that to Buildroot.
Root filesystem overlays
One easy way to add files to a buildroot image is using a rootfs overlay. This is set in the System configuration menu of buildroot. With this, the contents of a folder are overlayed on the generated image, making it very easy to add files. Like an IRC services program. After some trial and error my rootfs overlays looks like this:

Apart from irc services, this also contains a few things like the init scripts to start the irc server and network, a network config for a static IP address and the configs for IRC. All of this can be found online on my Github. In board/atmel/atngw100/rootfs-overlay to be exact.
Conclusion
So, does this all work?
It sure does! As an added bonus, the power consumption of this board is below 1 watt, which is a nice bonus for something running 24/7. The board normally wants a 9 to 15V power supply, but runs fine on 5V as well. So a small mod to add a USB power connector later and I can just power it via the USB port of my router.

So all in all, this was a fun dive into an older raspberry pi like board. While not as fast or easy to use as the first raspberry pi, it is still a usable board for some things. Though I would not recommend anyone to go out and buy these nowadays :)
Buildroot remains a fairly easy and fun way to create custom embedded Linux images and for a very single porpouse box like an IRC server it works wonder for a small image. This machine uses just 10MB of the 32MB RAM. In storage, everything fits in the 8MB parallel flash as the image uses just 6.5MB! Impressive!
All the buildroot files and config can be found on my Github. It should be as simple as a make atngw100_irc_defconfig && make. I hope you enjoyed this look at some old school embedded Linux, and if you did, consider sending me a coffee!
3 Comments