

Yes I bought more 1980s computers. This time an HP9000/310. This is a computer launched in 1985 meant to control measuring equipment via HPIB, the interface later renamed to GBIP and still in use today. Now, a computer from the 80s meant to control EE equipment is not something I could not buy right?
The computer was stored working, but a little dirty. I first checked if the power supply was operating in spec and if there was any visible damage from things like leaking capacitors or batteries. That all seemed OK, so let’s turn it on!
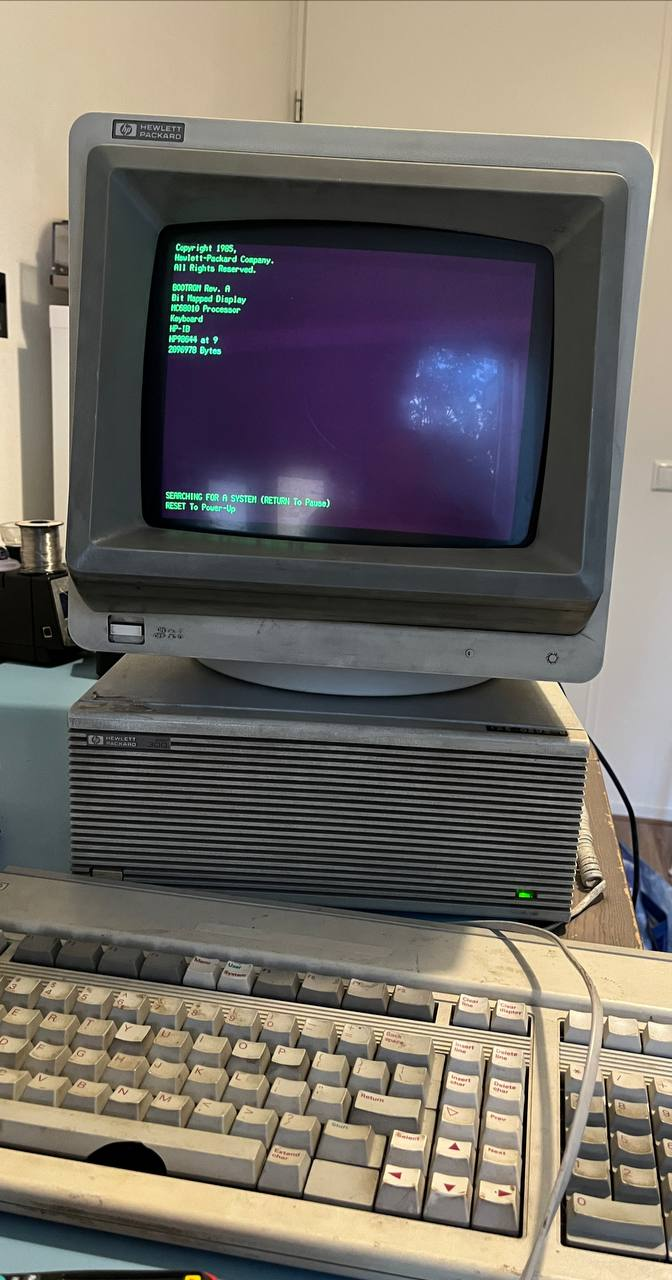
And indeed, it still works! Now let’s take a good look at it, give it a clean and see if I can make it do something fun.
The specs:
First of all, what did I all buy, what specs does it have and what does it do?
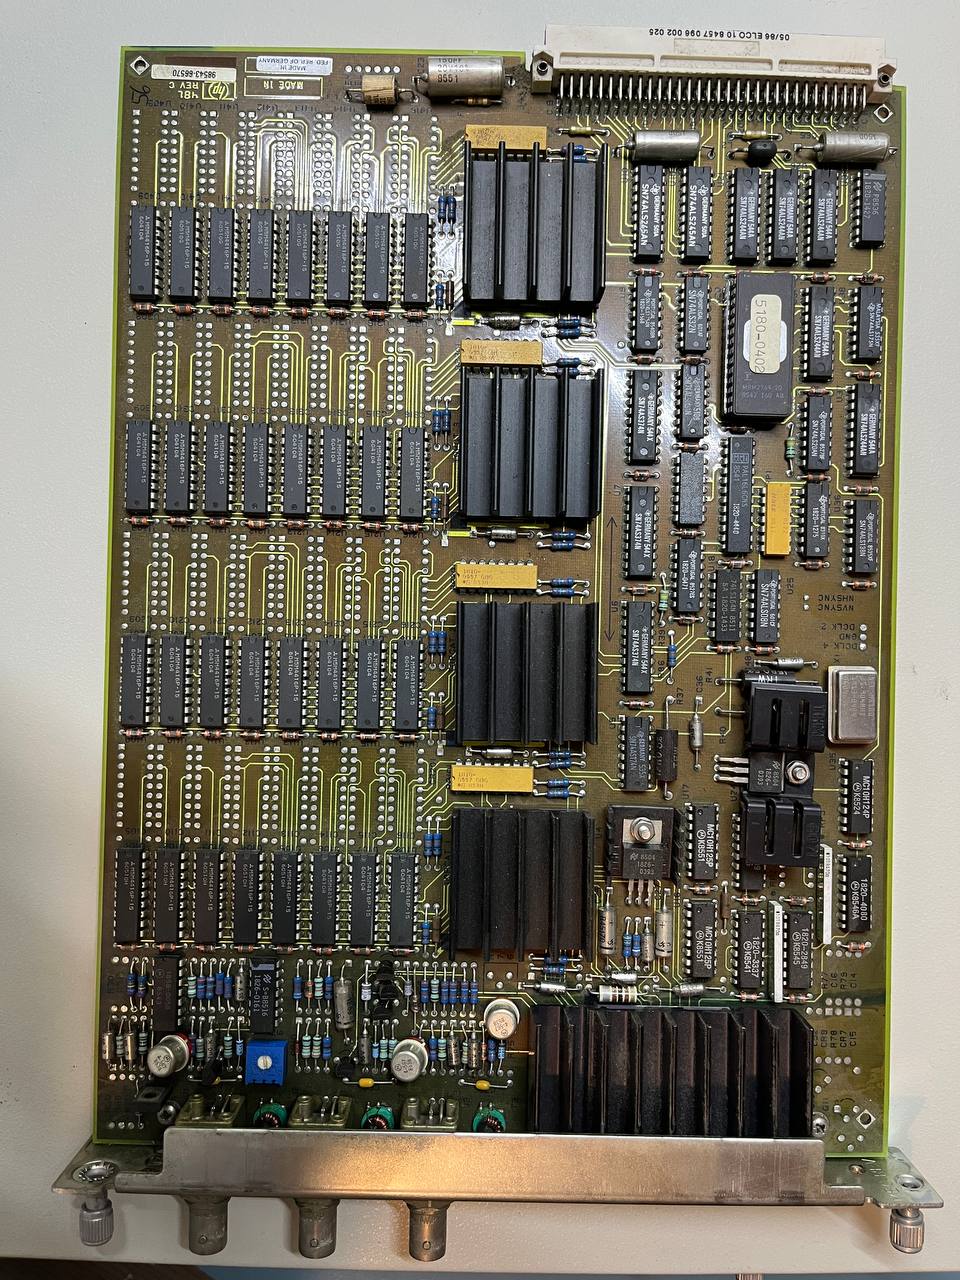
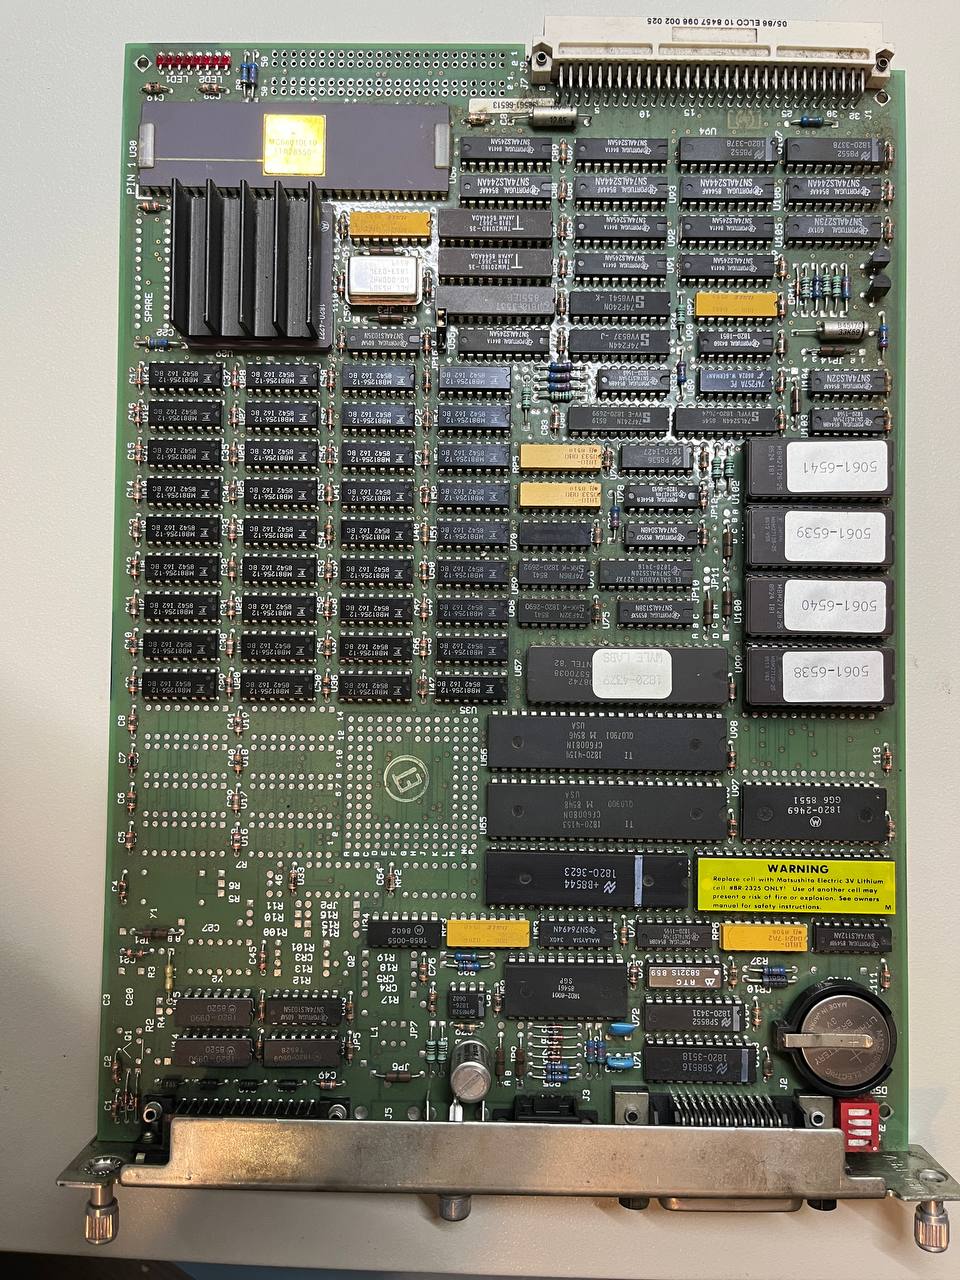
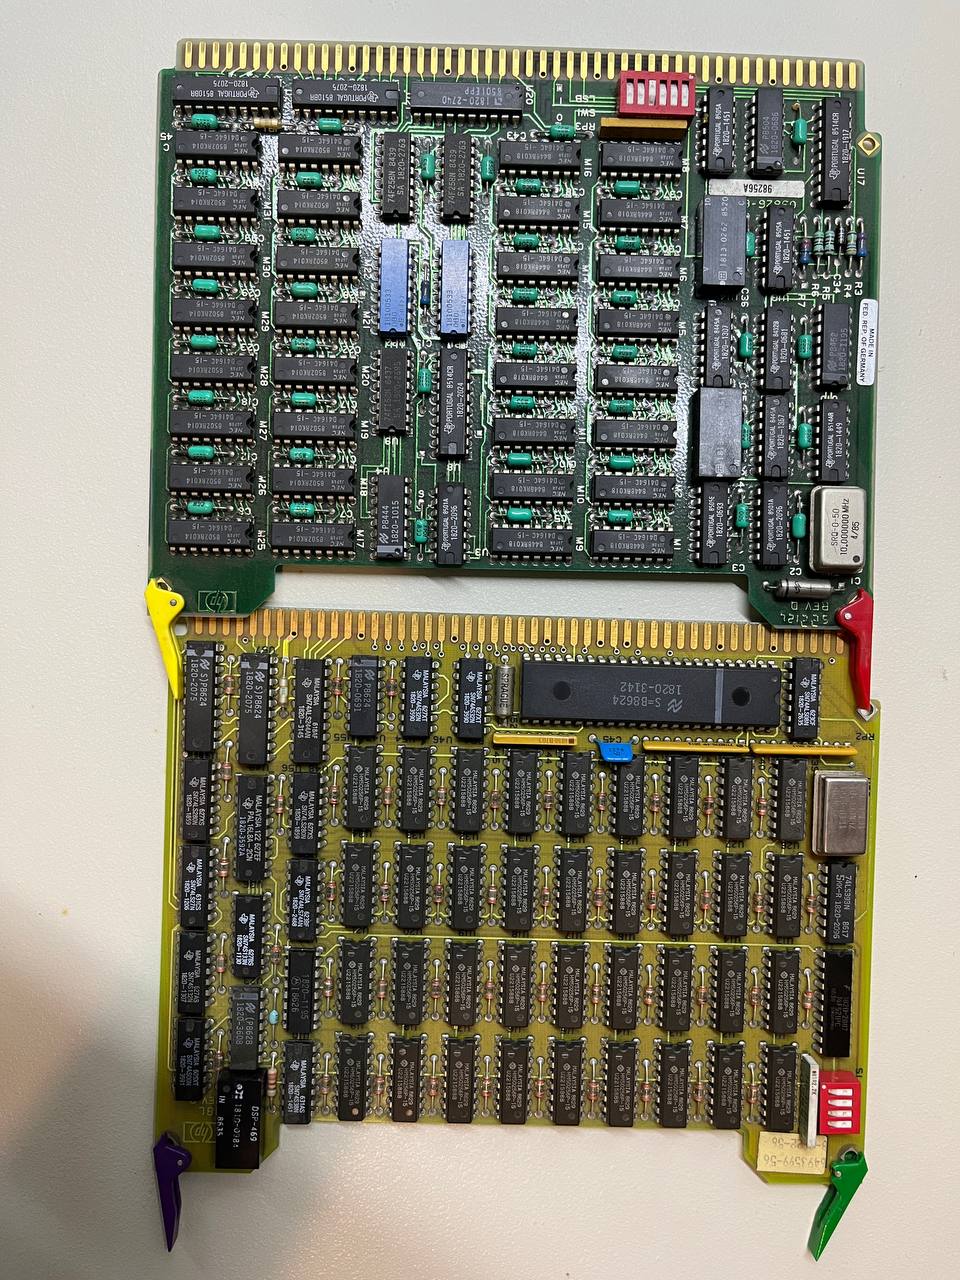
It seems I got a complete system. Which means I got an HP9000/310 computer with a 10Mhz 68010 CPU, 1MB RAM and a 98543A color video card. This beast drives a 512*400 pixel monitor in glorious 16 colors. Not 16 bit, just 16 colors :) The monitor is the HP 35741B.
There are 2 extra cards in it, an HP 98256A 256KB RAM module and an HP 98257A 1MB RAM module, for a total of 2.25MB RAM!
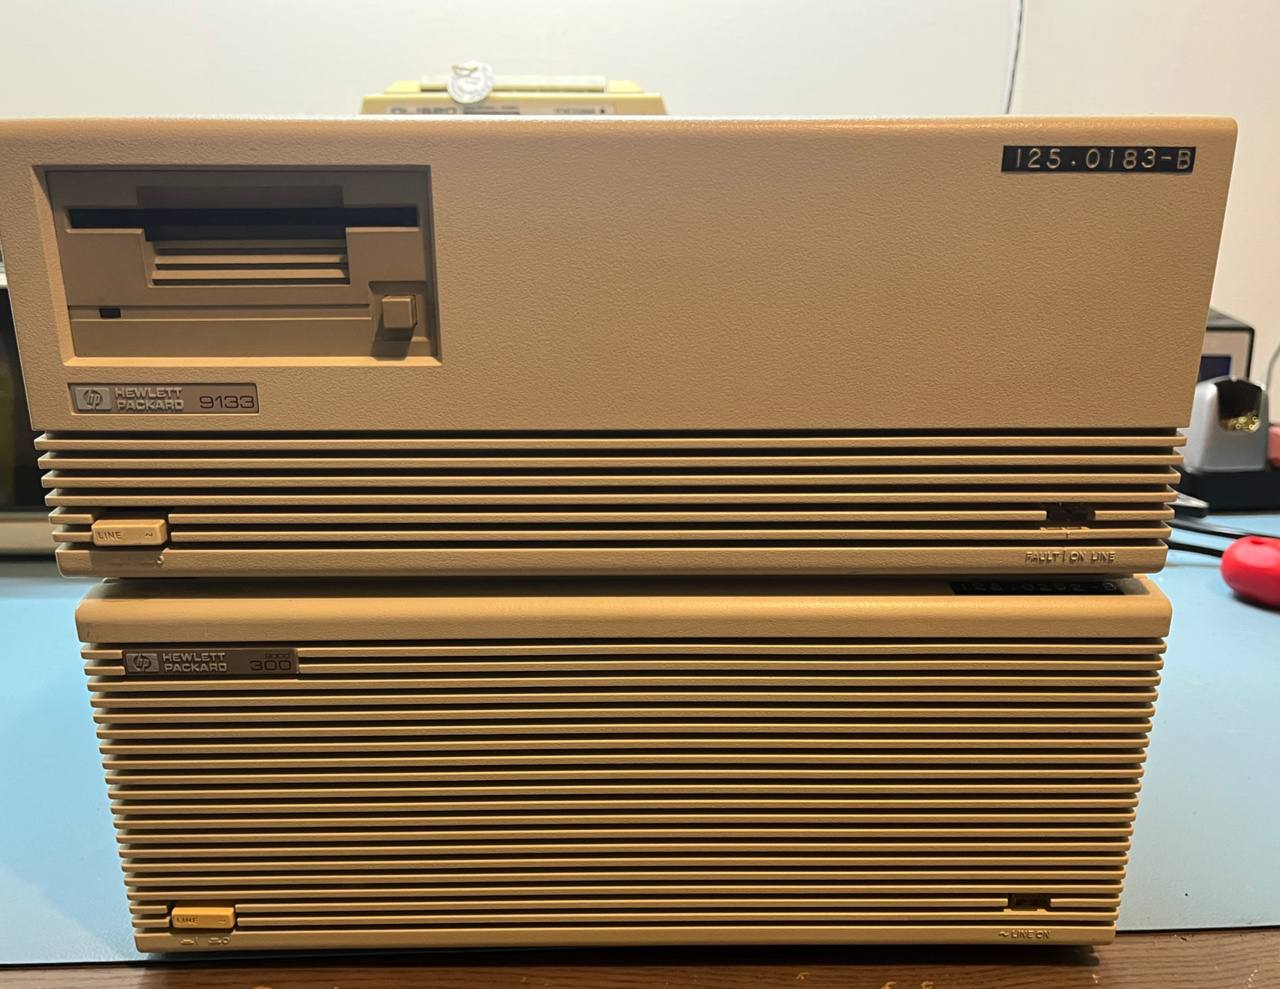
This computer lacks any storage except the on board ROM. Floppies and hard drives go in a separate box. I got the HP 9153A which in my case has a 720KB 3.5″ floppy drive and a 14.8MB hard drive.
And of course, a proper computer would not be complete without a printer. In this case, an HP 82906A.
So, in total this system would have set you back $7850 for the computer with display, $2600 total for the RAM cards and another $1940 for the HDD/floppy box. Add the $795 for the printer and the total is a whopping $13185. Or over $36000 with inflation added! Yikes. Luckily computers have gotten a little cheaper nowadays :)
Let’s look inside! (and give it a clean)
Except some damage to the keyboard and quite some dirt, it seems to all work fine. So let’s give it a clean, which it desperately needs, and have a look inside.
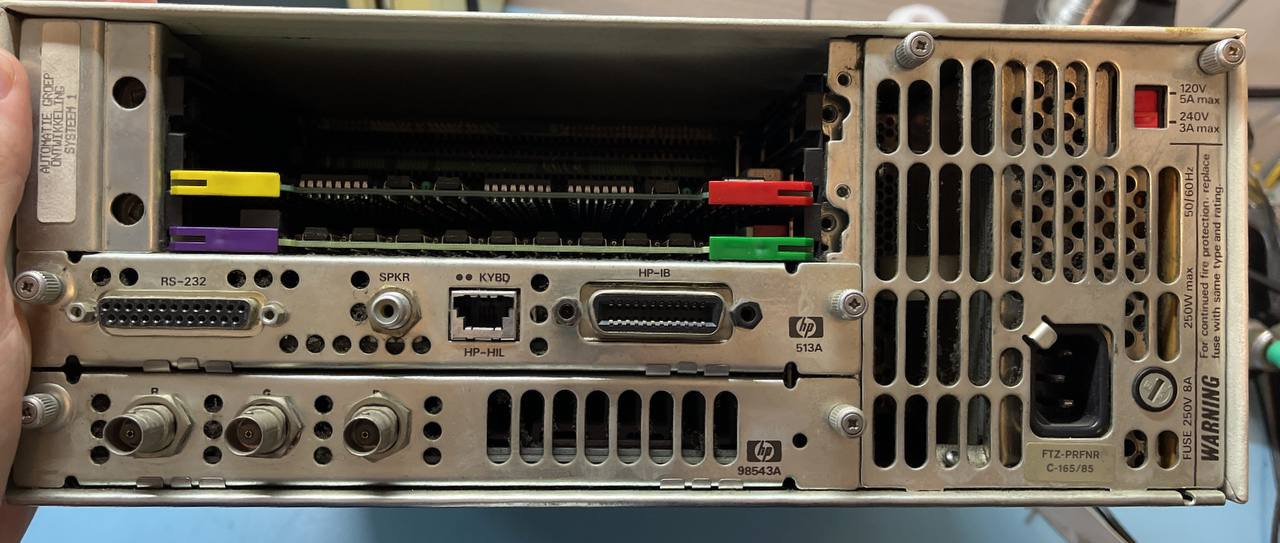
The computer has some thumb screws on the back and is a card based design. The CPU card, Video card and ram cards slide out easily, revealing a backplane inside. The power supply is removed almost as easy. 2 thumb screws, one screw to hold the ground wire in place and it also slides out. This is some awesome mechanical design, I love it!
The dirt however, I love less.

The boards are quite dusty and the inside looks even worse. I took the entire computer apart, removed the front panel, the backplane and the fans to give it a clean. I cleaned the outside with de-greaser and some compressed air took care of the dust. Now the cards look a lot better!
And all assembled, that makes for one clean computer!

The storage box needs a clean too
Next, the storage box. A few screws on the back, and off comes the cover, revealing again plenty of dust. And look at that hard drive, a full-size 5.25″ one, it even has the front panel on it!
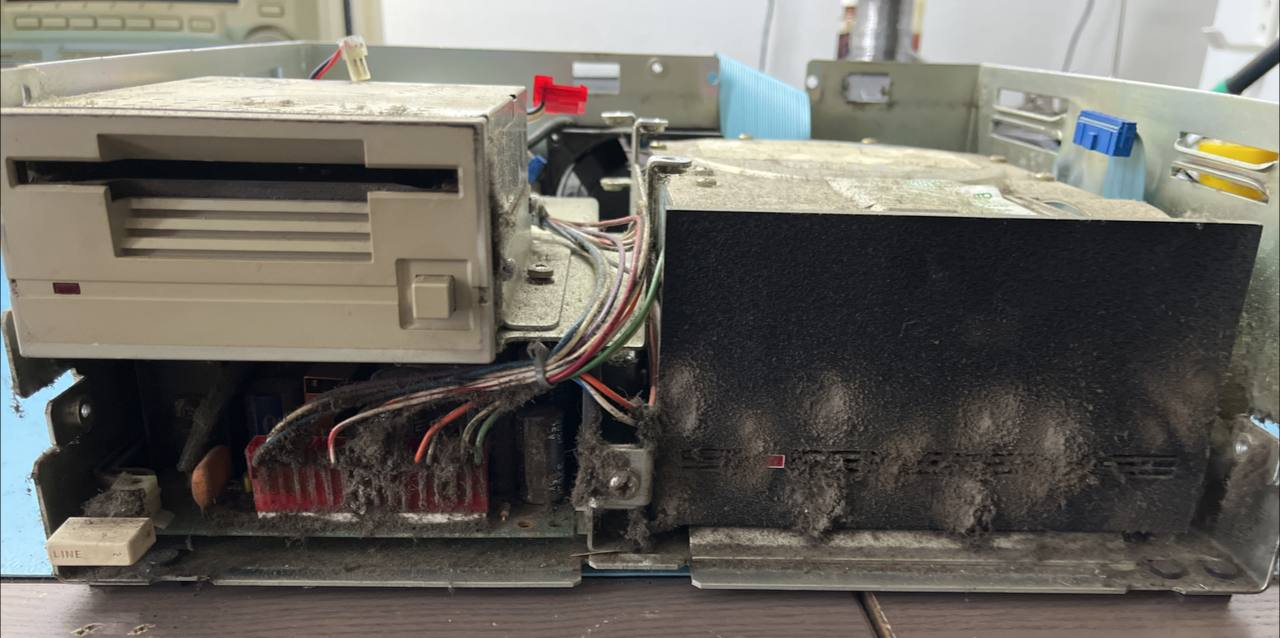
Again, a quick de-dusting and cleaning makes it look a ton better. The floppy drive needed a lot of dust removing, and a bit of lube on the mechanical bits so the locking mechanism worked again.
And that makes one cleaner looking HDD box, lovely.
The keyboard is a rubberdome one, nothing too special. But HP had their own keyboard protocol and connector, so I am glad it came with keyboard. Cleaning them is not too bad, remove all keycaps, take it all apart, hot water and a bit of soap does wonders.
I also got a mouse like device, it has a wheel and a button. It’s the HP 46083A, perhaps for scrolling through graphs or such. The printer I did not hook up or clean yet, due to lack of desk space.
So all in all, the complete computer looks like this, much much nicer and now I don’t get dirty fingers if I use the keyboard!

PAWS, or Pascal Workstation
This machine can run several different operating systems. HP-Basic being a popular choice, but a Pascal based OS and of course a Unix based OS called HP-UX where possible as well. After poking around on the system, it seems mine is running PAWS 3.2, or PAscal WorkStation. With that known, I could look around for some documentation for it.
Luckily there is a lot of documentation available on Bitsavers, awesome! With this I could read up on PAWS and start trying to code some Pascal. I have not used Pascal before, but a hello world program in it looks like this:
program Hello(OUTPUT);
begin
  writeln ('Hello, world.');
end.
A small change is needed compared to a normal Pascal program. It seems that to output text, the (OUTPUT) is needed on this machine. And to get input from the terminal, INPUT has to be added. Apart from that, seems like all Pascal from the late 80s works.
To run the program, first it is entered using the editor in PAWS, then compiled using the compiler and then executed. This all takes around a minute, which is mostly loading the editor and compiler programs from HDD to RAM. It should be possible to move files to RAM to save on loading times, but I have not tried that yet.
Of course, text IO is fun and all, but this is a powerful workstation, with colour graphics, let’s use that! On the Bitsavers link, there is also a PDF for graphical programming for this machine so let’s make some cool graphs:
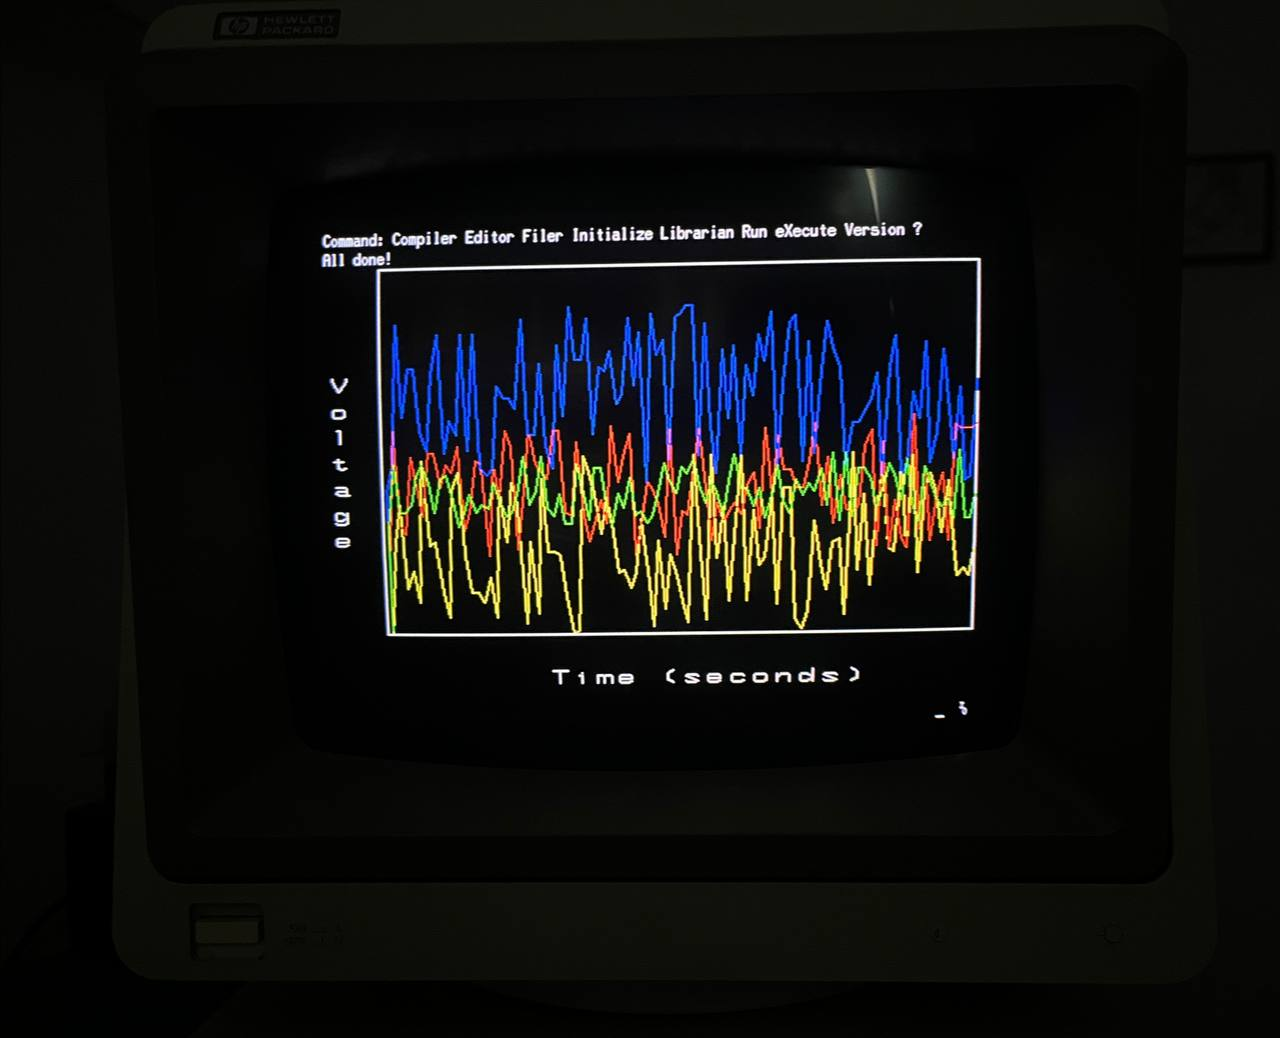
Wow, Those are some cool graphs! The code for it is quite simple, I just used the line drawing function and some random numbers, but it looks quite neat for 1985 I’d say. The code is as follows:
PROGRAM SINLINE(OUTPUT);
IMPORT DGL_LIB, DGL_INQ, RND, SYSGLOBALS;
CONST
    CrtAddr=        3;
    Control=        0;
VAR
    ErrorReturn:    integer;
    VLabel:         string[7];
    LabelCnt:       integer;
    X:              integer;
    Y:              real;

procedure DrawLine(color,startY,seed,range: integer);
var
    X:      integer;
    Q:      integer;
    seedRet: integer;
    Y:      real;
begin
    set_color(0);                   { Set colour to black for now }
    move(1,1);                      { move cursor to start }
    set_color(color);               { set desired colour }
    seedRet:=seed;                  { initial seed value }
    for X:=1 to 100 do begin
        Y:=rand(seedRet,range);     { rand updates the seed value and generates a random number }
        line(X,Y+startY);           { and draw the line to that point }
    end;
end;

BEGIN

graphics_init;
display_init(CrtAddr,Control,ErrorReturn);  { init values stolen from PDF :) }

if ErrorReturn=0 then begin
    set_aspect(511,399);

    VLabel:='Voltage';
    move(-0.95,0.3);
    for LabelCnt:=1 to strlen(VLabel) do
        gtext(str(VLabel,LabelCnt,1)+chr(13)+chr(10));  { Print the label + /r/n }
    move(-0.3,-0.9);
    gtext('Time (seconds)');
    set_viewport(0.1,0.99,0.12,0.7);                    { set the range of set_window command below ) }
    move(-1,-1); line(1,-1); line(1,1); line(-1,1); line(-1,-1); { And draw a box around it }

    set_window(0,100,0.0,100.0);

    DrawLine(3,0,42,50);
    DrawLine(2,20,7,40);
    DrawLine(6,40,921,50);
    DrawLine(4,30,1337,20);
end;

graphics_term;  { And done with all this graphics stuff!}
writeln('All done!');
end.
I used several API calls like “rand”, “gtext” and “line”. I added comment (between { } in Pascal) to explain what they do, but when in doubt, the Pascal Graphics Techniques book is the book to read. It’s just a simple example but looks pretty nonetheless.
But what was it used for?
Of course, one of the fun things to do with an old workstation is to peek at the files still on it. So after getting used to navigating PAWS, I set out to backup all files. It’s just a few MB, or when using the floppy drive, 6 or 7 floppies. The machine wants a 3.5″ floppy drive, but one that is 720KB. Luckily if you take a modern 1.44MB and cover up the hole with some tape, it turns into a 720KB one.
Now, it’s an HP machine from 1985. the file system used is of course not FAT. HP at the time used LIF as a filesystem. I got an old HP logic analyzer that uses the same so I have some experience with it. And HP ehm Agilent EHM Keysight still have the DOS/W9x lifutil tool online. This tool only works on DOS,W95 and W98, but I have an old laptop running Windows 98 handy. There are also more modern options but I have no experience with them yet.
After some trial and error, the best method was to format a floppy as LIF using the lifutils, put it in the HP9000, copy over files, back to the laptop, copy them to a USB stick, repeat. An hour later, all files are backed up.

So after looking at some files, it seems that all code was for a single measurement setup for mass spectrometers. After some trial and error, i got “some” data out:
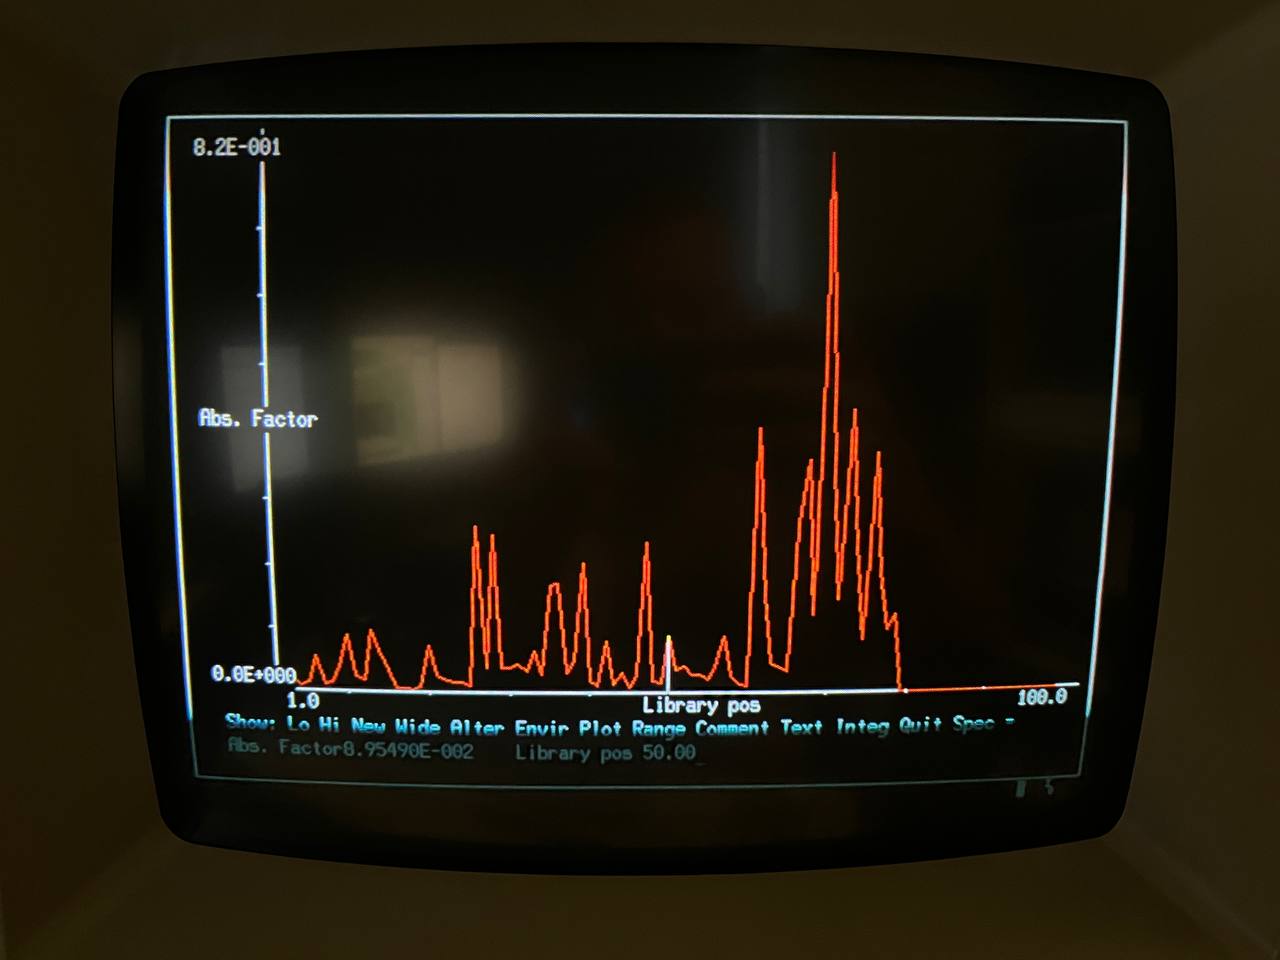

The PM2519 mentioned in this application is a Philips 5.5 digit bench multimeter, that can be controlled via GPIB. It seems this test setup used 2 of those and a mass spectrometer for some kind of measurement setup. While cool to look at, not something still useful unless someone has a spare spectrometer for me to play with :)
Files and conclusion
When working on this machine, I backupped the HDD and the EPROMs on the CPU and Video card. All these files can be found here. The HDD had 3 partitions, system, with the PAWS OS, MWERK, with compiled files and MEET with all the source code. Meet is Dutch for Measure, so that makes sense.
I’m really happy with how this machine turned out, it cleaned up really well and it needed almost no repairs apart from a floppy drive that needed a clean. I’d love to connect some multi-meters or such to it, but I lack some cables for that at the moment. So enough pascal for now, and perhaps I will make an epic 80s measurement setup sometime.
If you enjoyed this blog, please consider sending me a coffee!
I used that exact computer in word processing class in high school in 1994! Floppy disk were so cool then! I knew nothing about a computer at that point, thanks for the specs that was running the first computer I ever touch! We all have came a long way!