This blog post assumes you know the basics of multiplexing and how an LED matrix works. The end result looks like this:
Let’s say you want to control an LED matrix. A plain boring 8*8 LED matrix you bought on Ebay a long time ago and is still somewhere in your desk. It’s pretty simple, after figuring out how multiplexing works you’ll have a smiley drawn on the LED matrix in no time at all. But it’s much prettier if the brightness of an LED matrix can be controlled via PWM, maybe make some nice animations as well. For an 8*8 LED matrix, 8 PWM outputs would be needed and you are good to go, something a bigger microcontroller generally has available. But what if you want a bigger LED matrix, 16*16 perhaps. And animations running smoothly at a high frame rate.
For an 8*8 LED matrix, to make it look smoothly, you need to multiplex the screen at about 100 Hertz minimum. So set a column, wait a short time, switch to the next column and set the value for this column, wait a short time etc etc. With 100Hz there is 10ms of time per screen, so about 1.2ms (10ms / 8 columns) per column. More then plenty to set some IO pins to show an image. For a 16*16 LED matrix this time halves to 0.6ms. PWM makes this a bit harder, as a whole PWM cycle must fit in this 1.2 or 0.6ms, meaning the PWM peripheral must run at 833 or 1666Hz minimum. This is all no problem for a PWM peripheral in a modern microcontroller.
But what if you don’t have 8 or 16 PWM pins? For example, an Arduino Mega has 12 PWM pins. ARM M microcontrollers like the STM32F103 have more PWM pins, but those are shared with other peripherals as well, so they might not all be available to use in a project.
An option is to bitbang PWM, toggle an IO pin quick enough to act as an PWM pin. This has the major downside of costing a massive number of CPU cycles. To get just 6 bit PWM, so 64 different levels of brightness, in the 0.6ms for an 16*16 LED matrix, the CPU must check 64 times if that IO has to be set high or not. This means that every ~10us the CPU has to handle IO. If you also want to calculate some animation to display, the CPU will be very busy.
This is where the DMA comes in. The DMA, or Direct Memory Access, is a peripheral available in many modern microcontrollers. Simply said, it’s a co-processor that can copy data from one place in the microcontroller to a different place without the CPU having to do a thing. It can be used to transfer an ADC value to a buffer in RAM and give a sign to the CPU when the buffer is full. The microcontroller I’ve used for this blog, the STM32F103, can transfer memory to memory, peripheral to memory and memory to a peripheral without the CPU doing a thing apart from setting up the DMA. Transferring data to a peripheral without costing CPU cycles. That sounds like a nice way of driving an LED matrix.
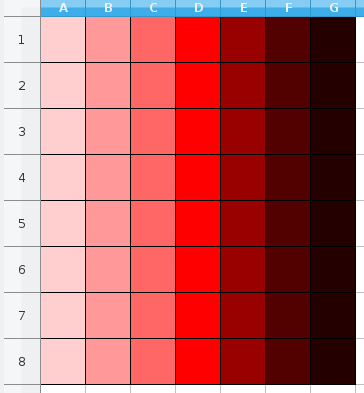
Let’s try to display something simple first, setting column 1 at a low brightness, column 2 a bit higher then column 1 and continue to column 8. This all with a 4 bit PWM, so 16 possible levels of brightness.
A pattern that would look something like this:
A buffer in C for that would look something like this:
uint8_t bufin[8][8] = {
{0x01,0x03,0x05,0x07,0x09,0x0B,0x0D,0x0F},
{0x01,0x03,0x05,0x07,0x09,0x0B,0x0D,0x0F},
{0x01,0x03,0x05,0x07,0x09,0x0B,0x0D,0x0F},
{0x01,0x03,0x05,0x07,0x09,0x0B,0x0D,0x0F},
{0x01,0x03,0x05,0x07,0x09,0x0B,0x0D,0x0F},
{0x01,0x03,0x05,0x07,0x09,0x0B,0x0D,0x0F},
{0x01,0x03,0x05,0x07,0x09,0x0B,0x0D,0x0F},
{0x01,0x03,0x05,0x07,0x09,0x0B,0x0D,0x0F}};
Column 1 is set to 0x01, the lowest brightness still on, and every column a big higher, ending with 0x0F for column 8. The way I hooked up my LED matrix is that I send the PWM to the rows, and switch the colums. So to show this on my LED matrix using PWM I need to set 0x01 to PWM output 1, 0x03 to PWM output 2, 0x05 to PWM output 3 and so on.
To do it with GPIO bitbanging, it would go like this:
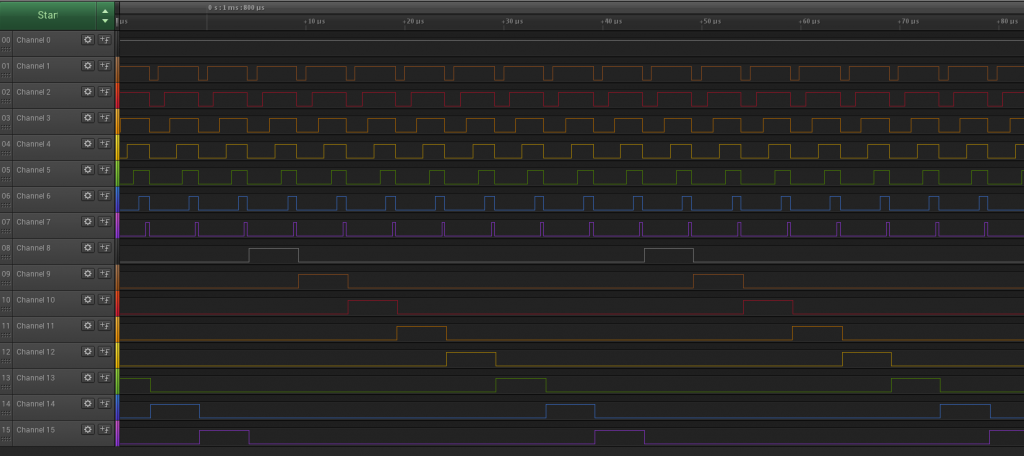
Set IO pin 1 high, and the rest low. Wait a bit and set IO pin 1 and 2 high, the rest low. Wait a bit and set IO pin 1, 2 and 3 high, wait a bit. And so on. This creates a waveform as following:
Which is a PWM signal of 100% duty cycle on IO 1, which is always on, 87.5% on IO 2, 75% on IO 3 and so on, until 12.5% duty cycle on IO 8. To do this with the DMA, the value 0b00000001 has to be transmitted from memory to GPIO twice, then 0b00000011 twice, then 0x00000111, then 0b00001111 and so on till 0b11111111. The GPIO peripheral will then transmit the following data:
IO: 87654321
00000001
00000001
00000011
00000011
00000111
00000111
00001111
00001111
00011111
00011111
00111111
00111111
01111111
01111111
11111111
11111111
IO 8 is high 2/16th of the time, IO 7 4/16th of the time and IO1 16/16th of the time. There are 16 possible steps in brightness. The array of data would look like this:
uint8_t ledbuf1[16] = {
0x01, 0x01, 0x03, 0x03, 0x07, 0x07, 0x0F, 0x0F, 0x1F, 0x1F, 0x3F, 0x3F, 0x7F, 0x7F, 0xFF, 0xFF};
This is just for 1 column, the full array for an 8*8 LED matrix would look like this:
uint8_t ledbuf1[128] = {
0x01, 0x01, 0x03, 0x03, 0x07, 0x07, 0x0F, 0x0F, 0x1F, 0x1F, 0x3F, 0x3F, 0x7F, 0x7F, 0xFF, 0xFF,
0x01, 0x01, 0x03, 0x03, 0x07, 0x07, 0x0F, 0x0F, 0x1F, 0x1F, 0x3F, 0x3F, 0x7F, 0x7F, 0xFF, 0xFF,
0x01, 0x01, 0x03, 0x03, 0x07, 0x07, 0x0F, 0x0F, 0x1F, 0x1F, 0x3F, 0x3F, 0x7F, 0x7F, 0xFF, 0xFF,
0x01, 0x01, 0x03, 0x03, 0x07, 0x07, 0x0F, 0x0F, 0x1F, 0x1F, 0x3F, 0x3F, 0x7F, 0x7F, 0xFF, 0xFF,
0x01, 0x01, 0x03, 0x03, 0x07, 0x07, 0x0F, 0x0F, 0x1F, 0x1F, 0x3F, 0x3F, 0x7F, 0x7F, 0xFF, 0xFF,
0x01, 0x01, 0x03, 0x03, 0x07, 0x07, 0x0F, 0x0F, 0x1F, 0x1F, 0x3F, 0x3F, 0x7F, 0x7F, 0xFF, 0xFF,
0x01, 0x01, 0x03, 0x03, 0x07, 0x07, 0x0F, 0x0F, 0x1F, 0x1F, 0x3F, 0x3F, 0x7F, 0x7F, 0xFF, 0xFF,
0x01, 0x01, 0x03, 0x03, 0x07, 0x07, 0x0F, 0x0F, 0x1F, 0x1F, 0x3F, 0x3F, 0x7F, 0x7F, 0xFF, 0xFF};
This also shows the biggest downside, the array is twice the size of the array we started with. Even worse, double the amount of possible brightness levels and the array is doubled in size. For 6 bit PWM, 64 brightness levels, the array would be 512 bytes big. 8 bit PWM, for 256 brightness levels and it’s 2Kbyte, the entire RAM of a normal Arduino. This means that sticking to a relatively low number of brightness might be needed for big LED arrays.
But this only takes care of generating PWM. After every 2^numofbits bytes, 16 in case of 4 bit PWM, the columns must be switched. First select column one, then column 2, then column 3 and so on. This can be done manually, but the STM32F103 has 7 DMA channels. Why not let the DMA do all the work? The array of data needed to do this looks like this:
const uint8_t columnchange[128] = {
0x01, 0x01, 0x01, 0x01, 0x01, 0x01, 0x01, 0x01, 0x01, 0x01, 0x01, 0x01, 0x01, 0x01, 0x01, 0x01,
0x02, 0x02, 0x02, 0x02, 0x02, 0x02, 0x02, 0x02, 0x02, 0x02, 0x02, 0x02, 0x02, 0x02, 0x02, 0x02,
0x04, 0x04, 0x04, 0x04, 0x04, 0x04, 0x04, 0x04, 0x04, 0x04, 0x04, 0x04, 0x04, 0x04, 0x04, 0x04,
0x08, 0x08, 0x08, 0x08, 0x08, 0x08, 0x08, 0x08, 0x08, 0x08, 0x08, 0x08, 0x08, 0x08, 0x08, 0x08,
0x10, 0x10, 0x10, 0x10, 0x10, 0x10, 0x10, 0x10, 0x10, 0x10, 0x10, 0x10, 0x10, 0x10, 0x10, 0x10,
0x20, 0x20, 0x20, 0x20, 0x20, 0x20, 0x20, 0x20, 0x20, 0x20, 0x20, 0x20, 0x20, 0x20, 0x20, 0x20,
0x40, 0x40, 0x40, 0x40, 0x40, 0x40, 0x40, 0x40, 0x40, 0x40, 0x40, 0x40, 0x40, 0x40, 0x40, 0x40,
0x80, 0x80, 0x80, 0x80, 0x80, 0x80, 0x80, 0x80, 0x80, 0x80, 0x80, 0x80, 0x80, 0x80, 0x80, 0x80};
For the first 16 bytes, only IO 1 is made high. The second 16 bytes, IO2 is made high, and so on. This array is just as big as the previous one, and it also increases in size the more brightness levels are used. Luckily this array never changes so it can be stored in FLASH instead of RAM by using the const keyword.
Now for the implementation, which depends on the microcontroller used. I used the STM32F103 as it’s a popular and cheap ARM M3 microcontroller and because ST has the amazing STM32CubeMX that can be used to generate a project with the peripherals already setup. The STM32F103 doesn’t count the GPIO peripheral as an peripheral, so the DMA is setup for a memory to memory transfer. It will transfer data from ledbuf1[] to &GPIOA→ODR, which is the GPIOA Output Data Register. Any value written in that register will be set to the IO pins of GPIO A. The second DMA channel will transfer data from columnchange[] to &GPIOB→ODR. Which is the data output register of GPIO B. The DMA channels are both setup to automatically increase the address of the data to be transmitted but keep the address of the receiving end the same. This ensures the buffer is transferred byte per byte to the same GPIO register. Normally the DMA stops when the buffer is transferred, but then it would only display one frame and after that the LED matrix would be off. To avoid this the DMA is placed in circular mode, in which it repeats itself indefinitely. The STM datasheet says that this is not a valid option for the DMA in memory to memory transfer mode, but it works regardless of what the datasheet says :)
The full DMA settings for channel 1 are:
/* Configure DMA request hdma_memtomem_dma1_channel1 on DMA1_Channel1 */
hdma_memtomem_dma1_channel1.Instance = DMA1_Channel1;
hdma_memtomem_dma1_channel1.Init.Direction = DMA_MEMORY_TO_MEMORY;
hdma_memtomem_dma1_channel1.Init.PeriphInc = DMA_PINC_ENABLE;
hdma_memtomem_dma1_channel1.Init.MemInc = DMA_MINC_DISABLE;
hdma_memtomem_dma1_channel1.Init.PeriphDataAlignment = DMA_PDATAALIGN_BYTE;
hdma_memtomem_dma1_channel1.Init.MemDataAlignment = DMA_MDATAALIGN_BYTE;
hdma_memtomem_dma1_channel1.Init.Mode = DMA_CIRCULAR;
hdma_memtomem_dma1_channel1.Init.Priority = DMA_PRIORITY_MEDIUM;
HAL_DMA_Start(&hdma_memtomem_dma1_channel1, (uint32_t *)ledbuf1, &GPIOA->ODR, 128);
Channel 2 is identical, expect the start command is:
HAL_DMA_Start(&hdma_memtomem_dma1_channel2, (uint32_t *)columnchange, &GPIOB->ODR, 128);
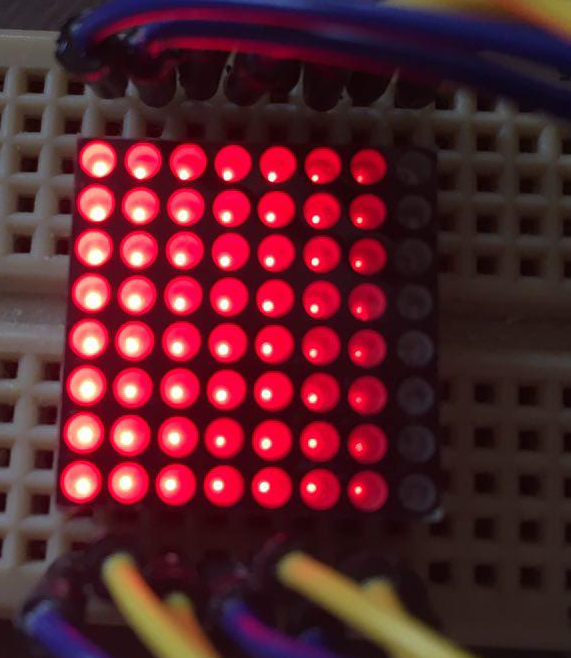
After all this effort, does it work? Well, a picture should demonstrate is effectively.
My LED matrix is connected with the cathode on the PWM IO’s, so with PWM IO 8 being 100% on, the cathode is off most of the time, until the column is selected. This results in row 8 being completely off, row 7 a bit on, row 6 a bit brighter and so on. Exactly inverted from the expected results. This can easily be fixed by inverting the PWM array in software though.
And a logic analyzer picture of all the 16 IO’s, 8 PWM and 8 to select the columns:
And there you have it, abusing the DMA to control an LED matrix, including dimming, with 0 CPU cycles. The STM32F103 has 16 bit GPIO ports, so a 16*16 LED matrix works without any issues. A 32*16 or 32*32 LED matrix is possible as well, but will take a few more DMA channels.
Manually converting the 8 by 8 array to the PWM array for the DMA is of course not very fun to do. I’ve added the function convertarray() to do the converting steps needed. This function converts a normal 8*8 array to an array the DMA can directly output to the LED matrix.
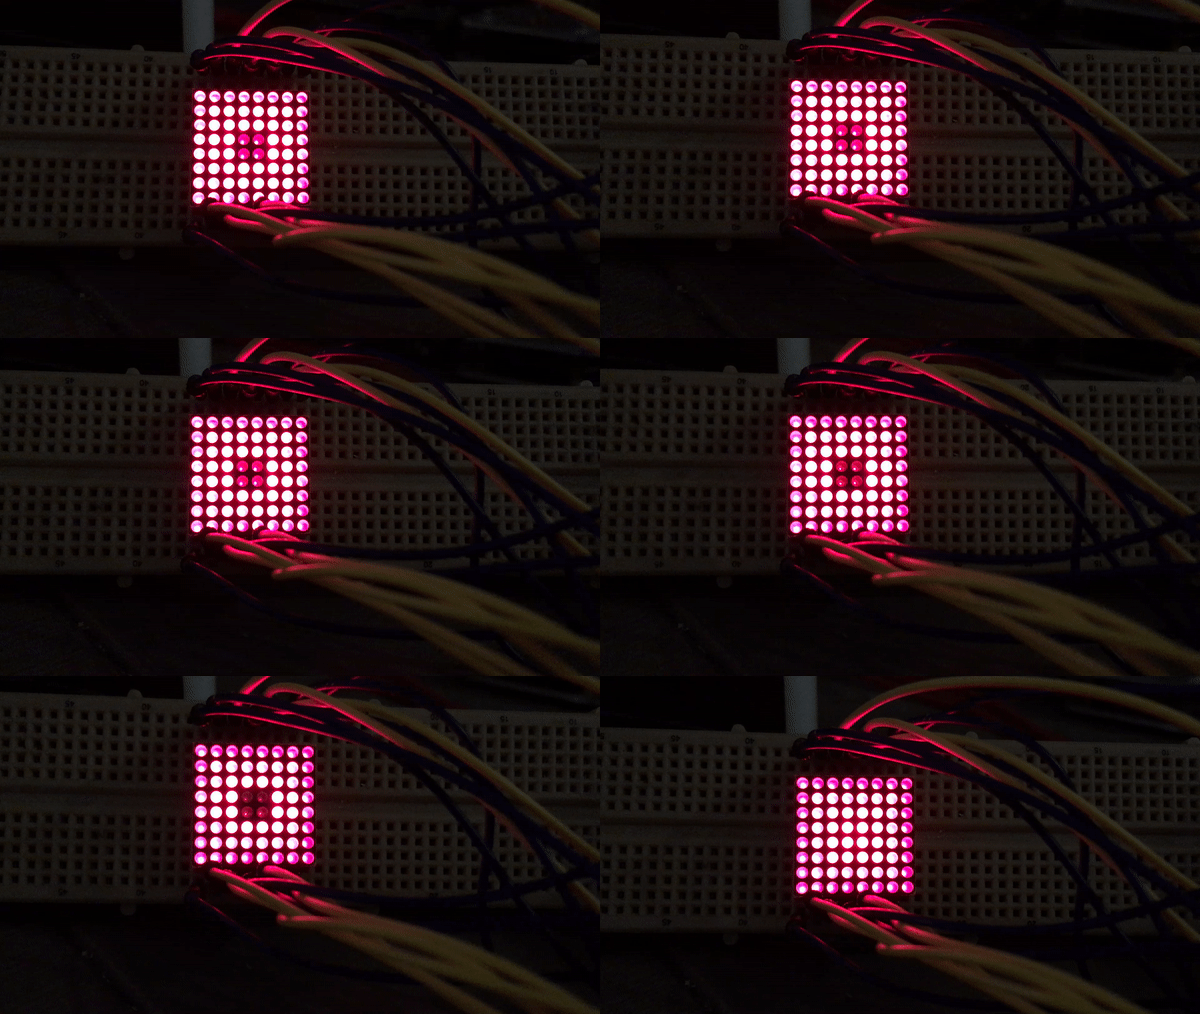
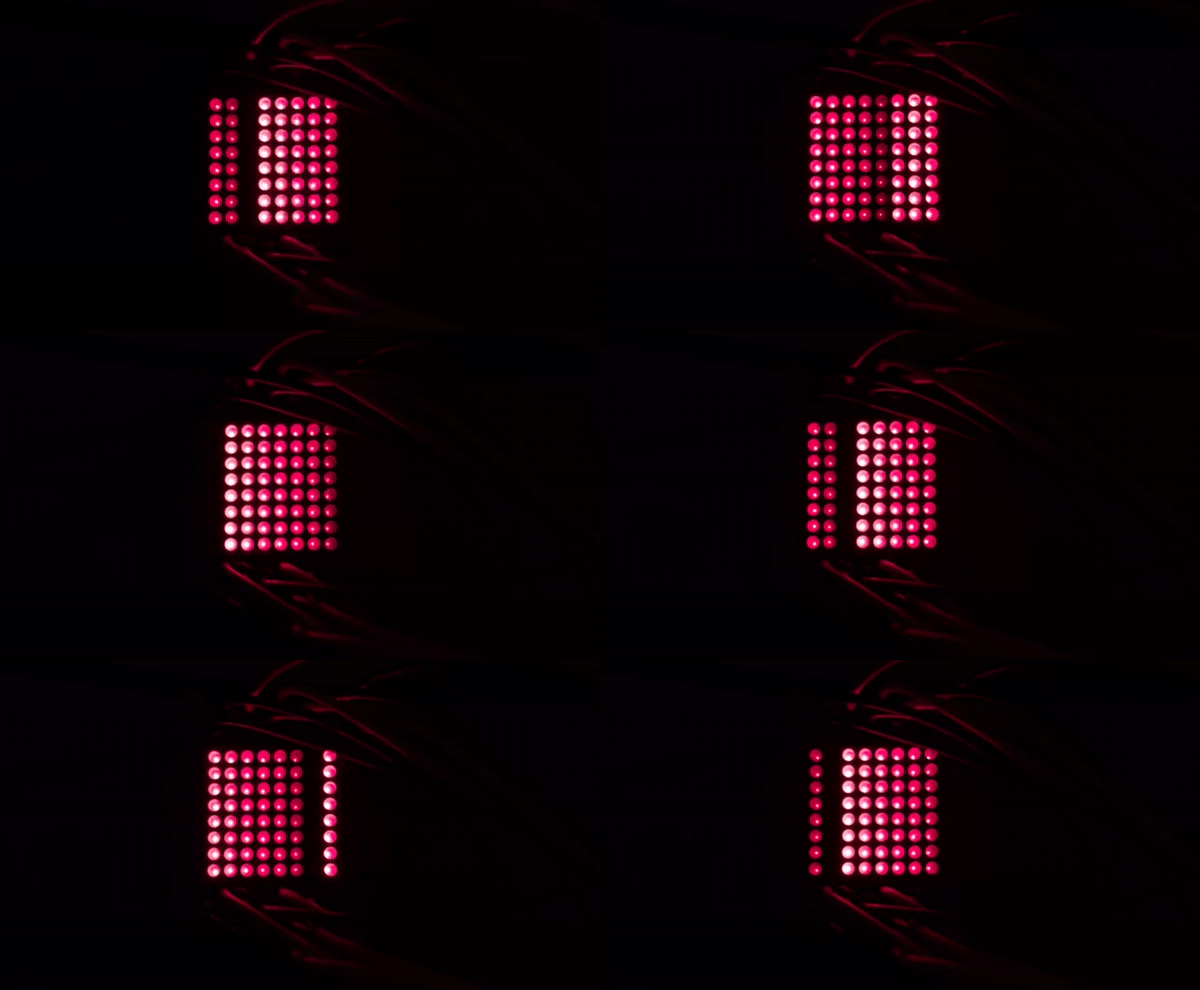
But, I started talking about animations. So let’s make something a bit cooler. For example, this:
A very simple function is needed to shift the 8*8 array 1 place to the left, do this a few times per second, convert it to an array for the DMA and store it in the same buffer the DMA already uses. The full main() code is:
HAL_Init();
SystemClock_Config();
MX_GPIO_Init();
MX_DMA_Init();
HAL_DMA_SetReady(&hdma_memtomem_dma1_channel1, (uint32_t *)ledbuf1, &GPIOA->ODR, 128);
HAL_DMA_SetReady(&hdma_memtomem_dma1_channel2, (uint32_t *)columnchange, &GPIOB->ODR, 128);
DMA1_Channel1->CCR |= 0x01;
DMA1_Channel2->CCR |= 0x01;
while (1)
{
left_rotate(bufin);
convertarray(ledbuf1, (uint8_t*)bufin, 8, 8);
HAL_Delay(DELAYTIME);
}
The one ugly thing is that the 2 DMA channels have to be started at exactly the same time. This is impossible, but it is possible to start them at almost the same time. The function HAL_DMA_Start has a lot of extra checking under the hood, so I created the HAL_DMA_SetReady function. It does exactly the same as HAL_DMA_Start, expect that it doesn’t start the DMA yet, it only sets up the DMA so it knows what to copy to where. To start the DMA I directly set bit 1 in the DMA CCR register, which is much quicker then using the HAL. Not doing this will result in ghosting or other oddities as the two DMA channels will run a bit out of phase, meaning the colums and rows are not controlled at the correct time.
The full code can be found here.
Now time for a prettier animation, now with 64 levels of brightness:
The animation is rather simple, generate a pattern with the outer ring of LEDs mostly off, one ring in a bit brighter, another ring in even brighter and the middle 4 LEDs on the highest brightness. After that just increase the brightness of every ring by one in a loop, setting the brightness very low after a ring reaches the highest brightness. The calcpulse() function takes care of this. After every loop the array is converted and thus the animation is displayed. To change the code from 4 to 6 bit PWM the array to switch the columns has been increased in length and the convertarray function has been changed so it accepts 64 different brightness values instead of 16.
The full code can be found on my github here. I used stm32cubemx to setup and generate the project and OpenSTM32 IDE. The project should import and compile if the same IDE is used.
I have used an stm32f103 nucleo board, the LED matrix is connected with the cathodes of the LED matrix to PA_0 to P_A7 and the anodes to P_B8 to P_B15. All the code is LGPL licensed unless stated otherwise in the file.



I stumbled onto this blog searching Google for something related to DMA. First of all, excellent work. The learning curve for the HAL libraries is certainly steep and working with the bare metal, especially DMA, is worth a compliment.
I read your code and found myself completely confused as to how the DMA was getting a clock without having any timer set to drive it and I think I can help shed some light on things (or I might be really wrong myself). This is related to your comment about the datasheet saying circular mode is not valid for memory-to-memory DMA transfer (caveat emptor: I did not RTFM prior to posting and I’m a tad hungover) as well as the comment about starting both channels at the same time. Here’s what I’m thinking: the memory-to-memory transfer must use something with the system clock as I’ve always worked with memory to peripheral DMA. I think that when you’re doing memory-to-peripheral DMA that you’re expected to set something as a clock source, such as a timer.
If that’s the case and memory-to-memory freewheels on the system clock, then I’m also guessing if you attempted to set memory-to-peripheral that it just didn’t work at all (lacking a clock source and all, and ST did a piss poor job demonstrating this when they through the HAL over the wall at us). It also would explain the issue you had about starting both DMA channels at the same time. The technique that I use is to first configure the DMA channels. HAL_DMA_Start_IT(…) — I use the interrupt because when the default HAL handler fires it cleans everything up. Then, I make a call to the ultra-intuitive __HAL_TIM_ENABLE_DMA(&htim1, TIM_DMA_UPDATE), for instance. Finally I call HAL_TIM_Base_Start or HAL_TIM_PWM_Start, et cetera, depending on how you want to clock your data out to GPIO. This also ensures all your DMA channels start at the same time.
There is one minor caveat to high speed DMA as well. It *does* cost CPU cycles, but the STM bus arbiter does a good job of hiding it from us. This document, pages 9 and 10 explains it: https://www.st.com/content/ccc/resource/technical/document/application_note/47/41/32/e8/6f/42/43/bd/CD00160362.pdf/files/CD00160362.pdf/jcr:content/translations/en.CD00160362.pdf
Binary code modulation (BCM) can greatly reduce the memory footprint http://www.batsocks.co.uk/readme/art_bcm_3.htm