Another day, another silly DIY computer.
Making a computer from scratch is a popular project, whether it’s done with an FPGA, an older CPU like the 6502, discrete logic like the 7400 series or even with just a big bag of transistors, so time to give it a go as well.
A good couple of years ago I designed a very simple ALU as a school project, but never did anything with it, so time to change it.
As it’s a horribly inefficient 8 bit CPU, I’ll call it the StupidCPU.
The StupidCPU is an 8 bit CPU, with 16 bit data buses, one data bus for executable code and one for RAM, making it a Harvard architecture CPU.
All peripherals are memory mapped as RAM.
As an 8 bit CPU has, well, 8 bits, some trickery is needed for having 16 bit buses. the RAM is accessed using bank switching and the program counter is 16 bits for accessing the executable code.
Every instruction is 12 bits wide and there is a maximum of 16 instructions, they all follow the following format:

With a maximum of 16 instructions, 4 bits are needed to select the instruction. The other 8 form an immediate value or an address for the RAM.
To keep everything simple, the CPU has 1 usable register, called the ACC register. As it can directly read and write to 256 RAM bytes, those are used as a kind of registers in the way a normal RISC CPU uses registers.
The StupidCPU also has 2 status bits, carry and zero. Carry is high when an overflow occurs and zero when the ACC register is zero.
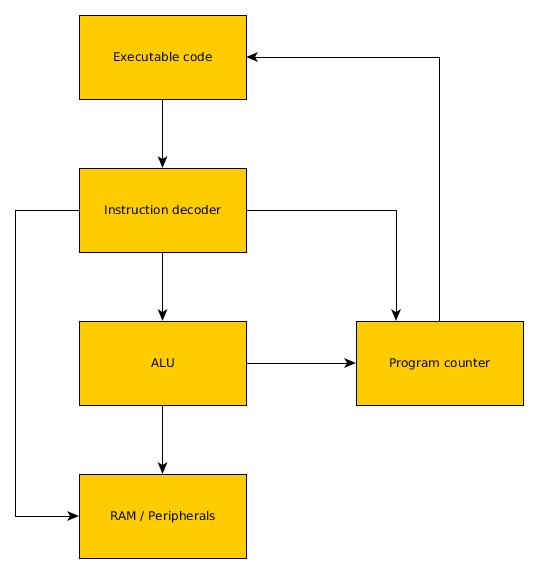
The high level architecture looks like this:
Instructions:
At the moment the instruction set is as follows:
NOR:
The NOR instruction executes a logic NOR on the ACC and the RAM value at the selected address, the result is stored in ACC.

NORI:
The NORI instruction executes a logic NOR on the ACC and the immediate value, the result is stored in ACC.

AND:
The AND instruction executes a logic AND on the ACC and the RAM value at the selected address, the result is stored in ACC.

ANDI:
The ANDI instruction executes a logic AND on the ACC and the immediate value, the result is stored in ACC.

ADD:
The ADD instruction adds ACC and the RAM value at the selected address, the result is stored in ACC.

ADDI:
The ADDI instruction adds ACC and the immediate value, the result is stored in ACC.

SHR
Logical shift ACC right 1 bit, store the result in ACC.

SHL
Logical shift ACC left 1 bit, store the result in ACC.

STA:
Store the ACC into RAM at the selected address.

JCC:
If carry is 0 or zero is 1, set the program counters lowest 8 bits to the immediate value.

JPCC:
If carry is 0 or zero is 1, set the program counter lowest 8 bits to the value in RAM at the selected address.

LPC:
Set the program counters lowest 8 bits to the immediate value

LTPC:
Set the program counters highest 8 bits to the immediate value, the next time the lowest 8 bits are changed. This means that after executing the LTPC instruction, the PC changed the next time an LPC instruction or a JCC/JPCC instruction with the carry at 0 or zero flag at 1 is executed.

STRAM:
Select the top RAM bank to use

This brings the total to 14 instructions out of the maximum of 16, so there is a bit of space left.
As this is a very limited set, some common macro’s are available, the assembler will translate them to the correct machine code:
NOP:
No operation.
Implementation:
Addi 0
NOT:
Invert ACC.
Implementation:
NORI 0
SUB:
Subtract ACC from the RAM value at the selected address, the result is stored in ACC.
Implementation:
NOT
ADD memaddr
ANDI 255
ADDI 1
SUBI:
Subtract ACC from the immediate value, the result is stored in ACC.
Implementation:
NOT
ADDI immediate
ANDI 255
ADDI 1
CLR:
Clear ACC
Implementation:
NORI 255
LDA:
Load an immediate value into ACC.
Implementation:
CLR
ADDI immediate
LDM:
Load a value from RAM into ACC.
Implementation:
CLR
ADD memaddr
MOVE:
Move a value from RAM to a different place in RAM
Implementation:
CLR
ADD srcaddr
STA destaddr
STORE:
Store an immediate value to RAM
Implementation:
CLR
ADDI immediate
STA destaddr
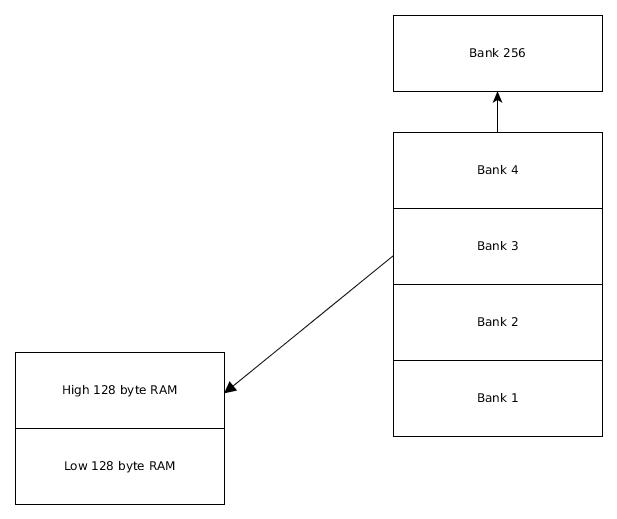
RAM banks:
The way the RAM works required some extra explanation, as it’s a bit unusual.
As the StupidCPU is an 8 bit CPU, it can access a maximum of 256 bytes of RAM, which is a bit low. To give it access to more RAM, bank switching is used.
With bank switching there are multiple banks of RAM, for example 4 banks of 256 bytes of RAM. The CPU can access one bank at a time, being able to select the accessible bank using a special instruction.
There is one problem for the StupidCPU, it has only 1 register. When the bank is switched, all previously accessible variables are gone. To counteract this, the StupicCPU has banks of 128 bytes, and only the highest 128 bytes of RAM are switched.
This way, the lowest 128 bytes of RAM are always accessible, the only downside is that with an 16 bit RAM bus the maximum amount of accessible RAM is 32K.
All peripherals are memory mapped, for example, an GPIO peripheral would be selected as a top bank and can then be written to/read from like RAM.
That’s it for now, the next blog post will go into some more design details.
Credit where credit is due:
The images made for the instructions where made with bitfield and the other images with yEd